Centipede-RS Dev Log #2
Getting started with Piston can be a little daunted right now. Mostly this is because it’s a project that is still evolving and which has either little documentation or documentation that rapidly becomes wrong. A lot of games that I found made with Piston can no longer be compiled, a lot of example code needs various minor tweaks to get to compile, etc. That said, the two best items that I found where:
- Piston Tutorials: Getting Started Which is buried in the Piston-Tutorials repository without any link from the other documentation
- Piston-Mov-Square Which is just a very simple program that appears better structured than other examples
Getting Started
The first hurdle in getting Piston to work was getting the SDL2 and GLFW
dependencies installed. Cargo does a great job of going out and grabbing
everything else, but these two items require you to do it yourself. SDL2 was
rather easy and the instructions for it can be found in the Getting Started
tutorial (see above). GLFW was a bit more of a pain and I ended up going through
a stack
overflow
question to get it working. If anything, I would just point to the Getting
started tutorial to get the initial empty repository set up with cargo and all
the dependencies in the Cargo.toml.
My Repository at this Point
At this point my repository looks like this I began by setting up a new Piston project as detailed in the Getting Started tutorial and from there I copied the code from the piston image example. This was just a nice starting point to ensure that everything is working and that the Rust logo would appear in the window designated.
From there, I began working through the Piston-Mov-Square project and the Getting Started tutorials and religiously commenting every line of the code with what it does. This is just something I picked up in college and a good way to puzzle out foreign code. Even if the comment turns out to be wrong (like it happened in many cases for myself), it at least is a step in manually dealing with the code.
I played around for a while and after I felt confident in the code that I had, I began abstracting it into various data objects and getting down to work. Hopefully my puzzling with help someone else to understand this faster than I.
An Explanation of the Code
Loading Crates
// Load external crates provided via cargo.
extern crate graphics;
extern crate piston;
extern crate sdl2_game_window;
extern crate opengl_graphics;

// Texture is used for images; Gl for accessing OpenGL
use opengl_graphics::{
    Gl,
};

// For creating a window
use sdl2_game_window::WindowSDL2;

// Stuff from piston.
use piston::{
    EventIterator,                  // Used for the game loop
    EventSettings,                  // Struct used for setting and updates
    WindowSettings,                 // Struct defines window config
    Render,                         // Render Evemt
};

use piston::graphics::\*;
use piston::shader_version::opengl;
We begin by loading all of our various library provided to us by the Piston
developers and which we will use for getting our game window to appear on the
screen. I have yet to figure out what the #![feature(globs)] lint actually
does and if someone does know, I would love to find out since removing it causes
everything to break. The rest of the code is just giving us access to various
libraries that we will use latter on. I have tried to comment those libraries as
best I could since it wasn’t entirely clear what does what.
Config and Main Entry Point
    // Config options for the game.
    Struct GameConfig {
        title: String,
        window_height: u32,
        window_width: u32,
        updates_per_second: u64,
        max_frames_per_second: u64,
        tile_size: uint
    }

    // Entry point for our game.
    fn main() {

        let config = GameConfig {
                title: "Centipede-RS".to_string(),
                window_height: 480,
                window_width: 800,
                updates_per_second: 120,
                max_frames_per_second: 60,
                tile_size: 32,
            };

        // Create and run new game.
        let mut game = Game::new( config );
        game.run();
    }
If there is one thing that I know it’s to confine magic
numbers. Let them
sprout wherever you please and code maintenance becomes a mess. Hence, I have
taken the various constants for our game and packaged them up into a
GameConfig struct. Right now this struct defines the attributes of our window:
title, height, width, frames per second, and tile size. I imagine that this
structure will probably grow larger as we begin adding in actors, players, and
assets. We will deal with that when the time comes.
I have also created a Game struct (more on it later). The game struct simple
takes a GameConfig and returns an instance of itself. Calling run fires off
our game loop which loops infinitely or until we kill the process. In essence
the Game struct represents and handles the loop. We could leave this in main,
but by turning it into a struct we have the option further down the line of
moving it out into a module which would leave our main.rs file consisting only
of loading Piston, setting the various config items and calling Game.run.
The Game Struct
// Represents the Game Loop struct Game { config: GameConfig }

impl Game { ...  }
I’ve seen this simply called App, but since we are making a game, I think it
should be Game. The Game simply holds the game state and runs the game loop.
Inside it, I have added several methods via impl: new, run, window, and
render. New and run are our public methods which we have already seen. One takes
a GameConfig and returns a Game. The other starts the game loop. The
remaining methods are just there to run the internals of the loop itself. Let’s
walk through each method:
// Returns a new game struct
pub fn new( config: GameConfig ) -> Game {

    // Return a new Game
    Game {
        config: config,
    }

}
Game.Run
This one is rather simple. It is a public function (pub fn) named new. We can
access it via Game::new(). It takes a GameConfig and returns a Game whose
config property is config. I am sure I am mixing a lot of OOP language here,
but after years of working in the realm of PHP that’s just how I end up
thinking.
// Run the game loop pub fn run( &mut self ) {

let mut window = self.window(); ...  }
Run is a little messier it fires off our game loop. It takes a mutable copy of
itself which allows us to access it on an instance of Game e.g. game.run().
The first line it calls is to a member function window():
// Returns a window.
fn window( &self ) -> WindowSDL2 {

    // Values for Window Creation
    let window_settings = WindowSettings {
            title: self.config.title.to_string(),
            size: [self.config.window_width, self.config.window_height],
            fullscreen: false,
            exit_on_esc: true,
            samples: 0,
        };

    // Create SDL Window
    WindowSDL2::new(
        opengl::OpenGL_3_2,
        window_settings
    )
}
This is not a public function, thus when we turn Game into a module it will not
be accessible outside of the module file. We are using this essentially as a
hidden or private method on Game. The window function is accessible from
inside a game object via self, e.g. self.window(). We really only need one
window, so this method is only called once at the start of the run method.
Window returns a WindowSDL2 which is our back-end we loaded way above at the
start for managing our windows. This window takes a WindowSettings struct
whose values we pull out of the GameConfig stored in our Game. Either way,
it makes a new WindowSDL2 and passes it back to the run method. Now back to
our second line of the run method:
// Get Gl let ref mut gl = Gl::new( opengl::OpenGL_3_2 ); Now this took me a while to figure out. The call to Gl::new() must come
after the creation of the WindowSDL2. In an earlier version of this I had
the call to create GL after the call to create the Window. The code will compile
fine if you create GL first and then the Window, but when you run it you will
get a CreateShader error. I only solved this by stumbling upon an IRC log.
Anyways, hold on to that gl variable since we’ll be passing it around a lot.
// Create Settings for Game loop
let event_settings = EventSettings {
    updates_per_second: self.config.updates_per_second,
    max_frames_per_second: self.config.max_frames_per_second,
};
Rather boring. We need to create and EventSettings object to pass into our
game loop.
// For each e in Event Iterator (whose range is 0 to infinity)
// e becomes a new Event by passing our window and event settings
for e in EventIterator::new(&mut window, &event_settings) {

    // If e is Render(args) do something, else return ()?
    match e {
        Render(args) => self.render( gl ),
        _ => {},
    }
}
Here is the magic! The game loop. I really like how this works in Rust. Since
iterators can go from 0 to infinite we take advantage of it. The EventIterator
takes the window and event_settings variables we set up earlier and returns
something (I don’t know what) which is put into e. We then do a match on e
to see what was returned. Right now there are only two things that can match: a
call to render the screen, or everything else. Looking at some of the example
code, I do see that we can catch all different kinds of events – user input,
calls to update the game state, etc. but for now we are just concerned with
rendering the screen. So we get a render event (Render(args)) and we call our
private method render via self.render and pass in our gl variable (I said
we would be passing him around a lot).
Game.Render
// Render the game state to the screen.
fn render( &mut self, gl: &mut Gl ) {
    let width = self.config.window_width;
    let height = self.config.window_height;

    // Get number of columns and rows.
    let tile_size = self.config.tile_size;
    let num_cols = width as int / tile_size as int;
    let num_rows = height as int / tile_size as int;
    ...
}
Render simply takes a mutable reference to Gl and paints to our screen. The
first two lines just get the window_height and window_width out of our
config since we will be using them a lot in this method. Since this is going to
be a tiled game we need to know how many columns and rows of tiles we will be
drawing. So I calculate that here by dividing the window’s height and width by
the tile_size.
// Creates viewport at 0,0 with width and height of window.
gl.viewport(0, 0, width as i32, height as i32);

// graphics::context a new drawing context (think html5)
let c = Context::abs(width as f64, height as f64);
The next two lines in our render call do two important things. First we set our
view port to start at the cordinates 0,0 and to extend to the width and height
of our window. Second, we get a Context which I like to think as our virtual
pen for drawing on our canvas. In fact, the first thing we do is fill the entire
canvas with white:
c.rgb(1.0, 1.0, 1.0).draw(gl); This takes an rgb (red, green, blue) value that sets each to a 100% (or white)
and then draws this to our window by calling draw and passing in our old friend
gl.
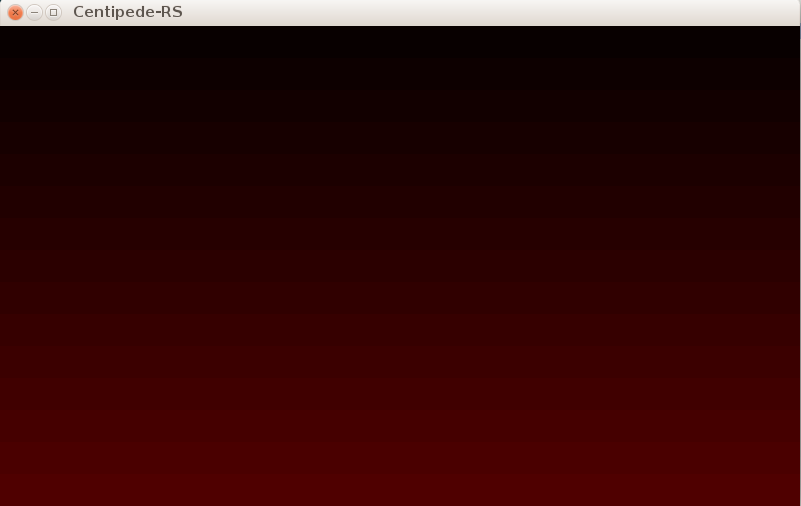
Now let’s have some fun. Just to show that we are indeed drawing on the window, let’s fill the window with 32x32 pixel tiles each one slightly reader than the last. The effect should look like this:
We begin by setting our starting red value:
let mut red = 0.01This needs to be mutable since we will be adding to it with each iteration of our rows.
Second, we loop through each row and each column drawing a red square the size of our tiles:
// Fill screen with red one 32x32 tile at a time.
for row in range(0i, num_rows ) {

    red = red + 0.02;
    let row_shift: f64 = row as f64 * tile_size as f64;

    for col in range(0i, num_cols ) {

        let col_shift: f64 = col as f64 * tile_size as f64;

        c.square(
            col_shift,
            row_shift,
            tile_size as f64
        ).rgb( red, 0.0, 0.0).draw(gl);

    }
}
What does this do? First we are looping through our rows from zero go num_rows
(we calculated the number of rows earlier). On each row we adjust our redness
slightly this should make each row more red than the last with the first row
being fairly dark. Next we calculate row_shift this is simply done my
multiplying what row we are on by the size of our tiles. This will be used to
tell the context to move down 32 pixels when it gets to row 2, and down 64
pixels when it gets to row 3 and so forth. The inner loop does the same only for
our columns. We loop through each column and calculate our col_shift or how
far to shift to the right for each column. If I recall correctly this is the
most efficient way to loop since the screen paints outwards from your upper-left
corner. Finally, we draw our square. The context (c) knows how to draw squares
so we pass into it the coordinates of the upper-left corner of our square
(col_shift, row_shift), the width of our square as a float (tile_size),
instruct the context to fill this square by calling rgb( red, 0.0, 0.0 ).
Note, we passed in our red variable so the redness of the tiles should adjust
as the red variable does. Last, we draw the square by calling draw and once
again passing in gl.
Call cargo build and cargo run and enjoy!