This summer, I plunged into the depths of my back up drives and came up with
some old projects that were growing some dust. Like most old projects, I find
them, get excited. Decide to do a major revolutionary revamp, and ultimately
just end up touching up some things and kicking them out the door. The
DropFramework is one such thing. For a long time, I wanted to make my own
micro-framework to compete with the likes of Slim or Silex. In the end though, I
really feel that those two have the space of micro-frameworks very well covered.
No one needs yet another PHP micro-framework with half-done ideas floating
around. Still, I did want to show it off, so I polished it up a little bit and
through it up on github. Below are my thoughts on “Yet Another PHP
Microframework”
Yet Another PHP Microframework
For all intensive purposes, you can consider this an abandoned project and I
would not recommend anyone actually use this in production.
A few years ago when Code Igniter was still quite a hot thing and a lot of
servers were still running PHP 5.2, e.g. the “dark ages” before we got all the
nice things that came along in PHP 5.3 it seemed to be quite the fashion for
everyone to try their hand at writing their own framework.
This was my go at it.
You will find a lot of similarities with Code Igniter (since that is the
framework I worked with at the time) and you might also find a lot of classes
that look like they came straight out of PHP Objects, Patterns and
Practice
since that was my bible.
I wanted to do a few things in writing the DropFramework:
I wanted to better understand the MVC pattern, the choices being made and
how CI works.
I wanted a framework that was small enough that I could read and understand
every class in it.
I wanted a framework with a very small footprint that worked by
transforming HTTP requests into request objects / command objects. This
allowed me to fire up multiple instances of the framework per HTTP request
with the master application generating it’s own request objects that it
would feed into it’s child instances and then construct a document out of
the application responses from the children.
I did not like at the time, and still do not like the major design patterns
of a lot of ORM solutions which tend to treat the database as the
authoritative model of the data. I rather turn this convention upside down:
treat the database as just another form of user input. The model can then
be constructed from any form of input – the database, an HTTP post, a
file. The PHP object is then the authoritative source for how the data
structure relates with other data. Any data coming into the model passes
through a validation layer that translates it (or rejects it if it
invalid).
Whether or not I succeeded at this items? I don’t think I would really know.
Version 0.4.0
The version of the framework that had been sitting on my hard disk for some time
was 0.3.0. In deciding to release it I have done two major things:
I created a simple example of the framework working. The
code for this example is
also up on github and a live
version as well.
I namespaced the entire framework and brought it into PSR-4 compliance
allowing for installation via Composer and the use of the Composer
autoloader. This defeats a lot of the purpose of the PHP 5.2 era frameworks
which devoted a lot of their resources to locating and managing the loading
of assets. This, of course, makes this no longer a PHP 5.2 compatible
framework and probably even makes a lot of the framework look rather silly.
Getting started with Piston can be a little daunted right now. Mostly this is
because it’s a project that is still evolving and which has either little
documentation or documentation that rapidly becomes wrong. A lot of games that I
found made with Piston can no longer be compiled, a lot of example code needs
various minor tweaks to get to compile, etc. That said, the two best items that
I found where:
Piston-Mov-Square Which is
just a very simple program that appears better structured than other
examples
Getting Started
The first hurdle in getting Piston to work was getting the SDL2 and GLFW
dependencies installed. Cargo does a great job of going out and grabbing
everything else, but these two items require you to do it yourself. SDL2 was
rather easy and the instructions for it can be found in the Getting Started
tutorial (see above). GLFW was a bit more of a pain and I ended up going through
a stack
overflow
question to get it working. If anything, I would just point to the Getting
started tutorial to get the initial empty repository set up with cargo and all
the dependencies in the Cargo.toml.
My Repository at this Point
At this point my repository looks like
this
I began by setting up a new Piston project as detailed in the Getting Started
tutorial and from there I copied the code from the piston image
example.
This was just a nice starting point to ensure that everything is working and
that the Rust logo would appear in the window designated.
From there, I began working through the Piston-Mov-Square project and the
Getting Started tutorials and religiously commenting every line of the code with
what it does. This is just something I picked up in college and a good way to
puzzle out foreign code. Even if the comment turns out to be wrong (like it
happened in many cases for myself), it at least is a step in manually dealing
with the code.
I played around for a while and after I felt confident in the code that I had, I
began abstracting it into various data objects and getting down to work.
Hopefully my puzzling with help someone else to understand this faster than I.
An Explanation of the Code
Loading Crates
// Load external crates provided via cargo.externcrategraphics;externcratepiston;externcratesdl2_game_window;externcrateopengl_graphics;// Texture is used for images; Gl for accessing OpenGLuseopengl_graphics::{Gl,};// For creating a windowusesdl2_game_window::WindowSDL2;// Stuff from piston.usepiston::{EventIterator,// Used for the game loopEventSettings,// Struct used for setting and updatesWindowSettings,// Struct defines window configRender,// Render Evemt };usepiston::graphics::\*;usepiston::shader_version::opengl;
We begin by loading all of our various library provided to us by the Piston
developers and which we will use for getting our game window to appear on the
screen. I have yet to figure out what the #![feature(globs)] lint actually
does and if someone does know, I would love to find out since removing it causes
everything to break. The rest of the code is just giving us access to various
libraries that we will use latter on. I have tried to comment those libraries as
best I could since it wasn’t entirely clear what does what.
Config and Main Entry Point
// Config options for the game.StructGameConfig{title:String,window_height:u32,window_width:u32,updates_per_second:u64,max_frames_per_second:u64,tile_size:uint}// Entry point for our game.fnmain(){letconfig=GameConfig{title:"Centipede-RS".to_string(),window_height:480,window_width:800,updates_per_second:120,max_frames_per_second:60,tile_size:32,};// Create and run new game.letmutgame=Game::new(config);game.run();}
If there is one thing that I know it’s to confine magic
numbers. Let them
sprout wherever you please and code maintenance becomes a mess. Hence, I have
taken the various constants for our game and packaged them up into a
GameConfig struct. Right now this struct defines the attributes of our window:
title, height, width, frames per second, and tile size. I imagine that this
structure will probably grow larger as we begin adding in actors, players, and
assets. We will deal with that when the time comes.
I have also created a Game struct (more on it later). The game struct simple
takes a GameConfig and returns an instance of itself. Calling run fires off
our game loop which loops infinitely or until we kill the process. In essence
the Game struct represents and handles the loop. We could leave this in main,
but by turning it into a struct we have the option further down the line of
moving it out into a module which would leave our main.rs file consisting only
of loading Piston, setting the various config items and calling Game.run.
The Game Struct
// Represents the Game Loop struct Game { config: GameConfig }implGame{...}
I’ve seen this simply called App, but since we are making a game, I think it
should be Game. The Game simply holds the game state and runs the game loop.
Inside it, I have added several methods via impl: new, run, window, and
render. New and run are our public methods which we have already seen. One takes
a GameConfig and returns a Game. The other starts the game loop. The
remaining methods are just there to run the internals of the loop itself. Let’s
walk through each method:
// Returns a new game structpubfnnew(config:GameConfig)->Game{// Return a new GameGame{config:config,}}
Game.Run
This one is rather simple. It is a public function (pub fn) named new. We can
access it via Game::new(). It takes a GameConfig and returns a Game whose
config property is config. I am sure I am mixing a lot of OOP language here,
but after years of working in the realm of PHP that’s just how I end up
thinking.
// Run the game loop pub fn run( &mut self ) {letmutwindow=self.window();...}
Run is a little messier it fires off our game loop. It takes a mutable copy of
itself which allows us to access it on an instance of Game e.g. game.run().
The first line it calls is to a member function window():
// Returns a window.fnwindow(&self)->WindowSDL2{// Values for Window Creationletwindow_settings=WindowSettings{title:self.config.title.to_string(),size:[self.config.window_width,self.config.window_height],fullscreen:false,exit_on_esc:true,samples:0,};// Create SDL WindowWindowSDL2::new(opengl::OpenGL_3_2,window_settings)}
This is not a public function, thus when we turn Game into a module it will not
be accessible outside of the module file. We are using this essentially as a
hidden or private method on Game. The window function is accessible from
inside a game object via self, e.g. self.window(). We really only need one
window, so this method is only called once at the start of the run method.
Window returns a WindowSDL2 which is our back-end we loaded way above at the
start for managing our windows. This window takes a WindowSettings struct
whose values we pull out of the GameConfig stored in our Game. Either way,
it makes a new WindowSDL2 and passes it back to the run method. Now back to
our second line of the run method:
// Get Gl let ref mut gl = Gl::new( opengl::OpenGL_3_2 );
Now this took me a while to figure out. The call to Gl::new() must come
after the creation of the WindowSDL2. In an earlier version of this I had
the call to create GL after the call to create the Window. The code will compile
fine if you create GL first and then the Window, but when you run it you will
get a CreateShader error. I only solved this by stumbling upon an IRC log.
Anyways, hold on to that gl variable since we’ll be passing it around a lot.
// Create Settings for Game loopletevent_settings=EventSettings{updates_per_second:self.config.updates_per_second,max_frames_per_second:self.config.max_frames_per_second,};
Rather boring. We need to create and EventSettings object to pass into our
game loop.
// For each e in Event Iterator (whose range is 0 to infinity) // e becomes a new Event by passing our window and event settingsforeinEventIterator::new(&mutwindow,&event_settings){// If e is Render(args) do something, else return ()?matche{Render(args)=>self.render(gl),_=>{},}}
Here is the magic! The game loop. I really like how this works in Rust. Since
iterators can go from 0 to infinite we take advantage of it. The EventIterator
takes the window and event_settings variables we set up earlier and returns
something (I don’t know what) which is put into e. We then do a match on e
to see what was returned. Right now there are only two things that can match: a
call to render the screen, or everything else. Looking at some of the example
code, I do see that we can catch all different kinds of events – user input,
calls to update the game state, etc. but for now we are just concerned with
rendering the screen. So we get a render event (Render(args)) and we call our
private method render via self.render and pass in our gl variable (I said
we would be passing him around a lot).
Game.Render
// Render the game state to the screen.fnrender(&mutself,gl:&mutGl){letwidth=self.config.window_width;letheight=self.config.window_height;// Get number of columns and rows.lettile_size=self.config.tile_size;letnum_cols=widthasint/tile_sizeasint;letnum_rows=heightasint/tile_sizeasint;...}
Render simply takes a mutable reference to Gl and paints to our screen. The
first two lines just get the window_height and window_width out of our
config since we will be using them a lot in this method. Since this is going to
be a tiled game we need to know how many columns and rows of tiles we will be
drawing. So I calculate that here by dividing the window’s height and width by
the tile_size.
// Creates viewport at 0,0 with width and height of window.gl.viewport(0,0,widthasi32,heightasi32);// graphics::context a new drawing context (think html5) letc=Context::abs(widthasf64,heightasf64);
The next two lines in our render call do two important things. First we set our
view port to start at the cordinates 0,0 and to extend to the width and height
of our window. Second, we get a Context which I like to think as our virtual
pen for drawing on our canvas. In fact, the first thing we do is fill the entire
canvas with white:
c.rgb(1.0,1.0,1.0).draw(gl);
This takes an rgb (red, green, blue) value that sets each to a 100% (or white)
and then draws this to our window by calling draw and passing in our old friend
gl.
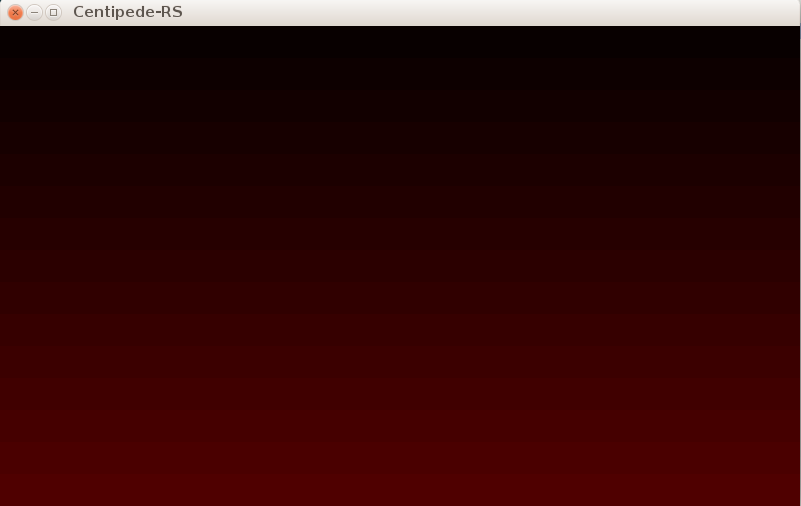
Now let’s have some fun. Just to show that we are indeed drawing on the window,
let’s fill the window with 32x32 pixel tiles each one slightly reader than the
last. The effect should look like this:
We begin by setting our starting red value:
letmutred=0.01
This needs to be mutable since we will be adding to it with each iteration of
our rows.
Second, we loop through each row and each column drawing a red square the size
of our tiles:
// Fill screen with red one 32x32 tile at a time.forrowinrange(0i,num_rows){red=red+0.02;letrow_shift:f64=rowasf64*tile_sizeasf64;forcolinrange(0i,num_cols){letcol_shift:f64=colasf64*tile_sizeasf64;c.square(col_shift,row_shift,tile_sizeasf64).rgb(red,0.0,0.0).draw(gl);}}
What does this do? First we are looping through our rows from zero go num_rows
(we calculated the number of rows earlier). On each row we adjust our redness
slightly this should make each row more red than the last with the first row
being fairly dark. Next we calculate row_shift this is simply done my
multiplying what row we are on by the size of our tiles. This will be used to
tell the context to move down 32 pixels when it gets to row 2, and down 64
pixels when it gets to row 3 and so forth. The inner loop does the same only for
our columns. We loop through each column and calculate our col_shift or how
far to shift to the right for each column. If I recall correctly this is the
most efficient way to loop since the screen paints outwards from your upper-left
corner. Finally, we draw our square. The context (c) knows how to draw squares
so we pass into it the coordinates of the upper-left corner of our square
(col_shift, row_shift), the width of our square as a float (tile_size),
instruct the context to fill this square by calling rgb( red, 0.0, 0.0 ).
Note, we passed in our red variable so the redness of the tiles should adjust
as the red variable does. Last, we draw the square by calling draw and once
again passing in gl.
A rather rambling design document for my ideas for a Centipede
clone that I’m releasing under
the MIT license. Following all my reading in Rust it
seems like a good idea to have some kind of project to complete. After
scrounging about for ideas, I came up with the one of doing an open source
centipede clone using Piston. This would be good
practice for trying a Rust Ludum Dare next April.
The following is more or less a rambling stream of consciousness design doc for
what I’m about to do. I’ll probably follow this up with a series of other
entries about the steps and break down of the code as I go.
Concept
A Centipede clone done in Rust using Piston with perhaps some additional flavor.
The core idea of the game is to have a gridded window of size X and Y with a
centipede that begins with one segment that grows as the game progresses. The
centipede moves continuously in the last cardinal direction specified by the
player. As the character moves it encounters various items randomly populated on
the screen. Upon contact some effect occurs such as adding an additional
segment. If the user comes into contact with itself (such as looping back around
on it’s own tail). The game ends or some failure condition occurs.
Objects in the Game
The Game
Well of course it’s an object unto itself. The game represents the game loop.
The Board
The board is 800x480 and divided into 32 pixel squares. At start of the game and
at a fixed interval actors are randomly assigned squares on the board.
Centipede
The centipede has the following characteristics:
Collection of Segments
Who each have a position and sprite
Who each have a direction (Each moves in the direction of the segment before
it except the head segment which moves in the last direction input by the
player).
If a segment intercepts another segment it destroys it. The severed segment
then becomes bombs.
Number of mushrooms eaten (Used as a score)
Actors
Actors specifies an indescriminate number of items placed on the board that the
centipede interacts with when it comes into contact with them. The actors need
to be able to expand to include new actors with new effects.
Sprite
Board position
An affect
Right now we have two actors: mushrooms and bombs. Mushrooms are placed randomly
on the board at a fixed interval. Bombs are segments that have seperated from
the centipede. They each have an affect. Mushrooms cause a new segment to be
added to the centipede after X mushrooms have been consumed. Bombs cause the
game to immediately end.
I just started delving into Rust last week with the release of the Rust Guide.
In Web Development, I really have moved away from the “bare level” languages of
my schooling into the flighty realm of scripting languages. For the most part,
I’ve been quite satisfied to leave behind the rigors of memory management and
obtuse C linking errors for PHP, JavaScript and Python.
Yet, Rust is the first systems language that really has gotten me excited to sit
down and try it out. Maybe get back into the indie game scene (which I have been
saying forever).
This post is going to be updated semi-regularly as just a continuing list of
Rust resources worth looking into:
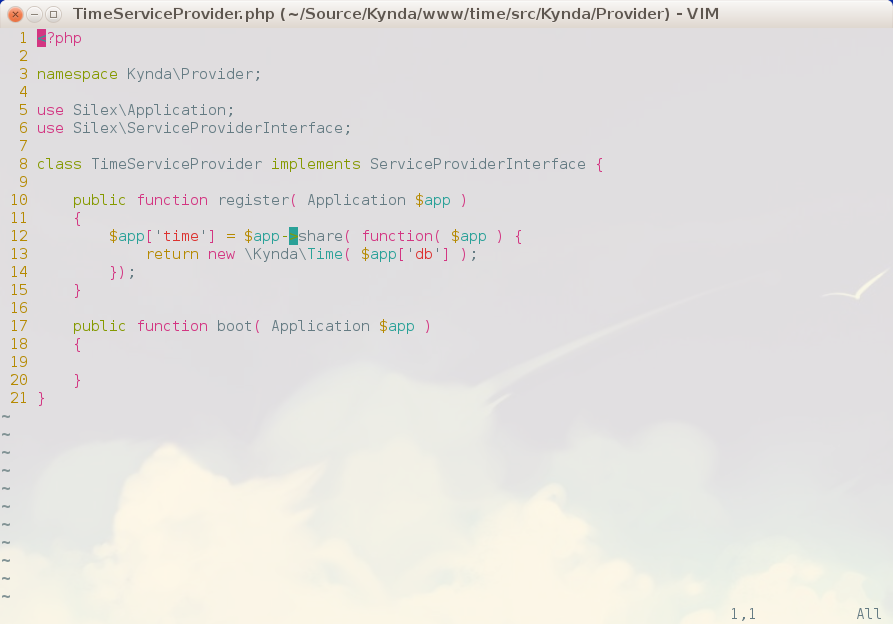
TimeKeeper is a little utility
tool that has become both a pet project for testing out new PHP and JavaScript
tools as well as a very useful tool that I use every day to keep track of my
billable hours, projects and tasks that are completed through out the day. An
example of TimeKeeper in action can be found at
timekeeper.kynda.net
This week, after a year of dormacy, I updated TimeKeeper to v0.1.1 with a major
internal refactoring and improvement in the interface’s “responsiveness.” Major
improvements include:
The UI is now 100% responsive thanks to a rewrite of all templates to
Bootstrap3
Libraries now install via bower and composer
Moved database configuration into a seperate config.php file, this along
with the bower and composer updates makes installing TimeKeeper much easier
100% Documentation of all interfaces and files used by TimeKeeper
Future Plans
TimeKeeper’s direction is still rather vague. This is a useful tool for a single
user to keep track of their own time. I am not yet sure if I want to keep it
focused on being a planning tool for a single user or to expand TimeKeeper into
a team-based tool.
The single biggest issue with TimeKeeper is that it does not provide a
password-protected user log in which means that it cannot be public-facing or at
least ends up relying on apache for user-login.
v0.2.0 RoadMap
For v0.2.0, which will be released “whenever,” I plan on adding the following
features to TimeKeeper:
Single-User Password Log In (so the site can be public-facing)
A Reports table that generates a variety of charts analyzing the filtered
time frame including: break down of 100% time spent per project or billable
hours; daily break down showing hours worked and whether they went over or
under 40 hours; Perhaps a monthly report as well.
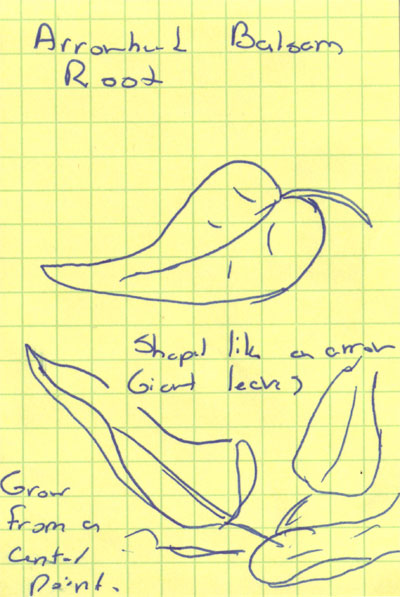
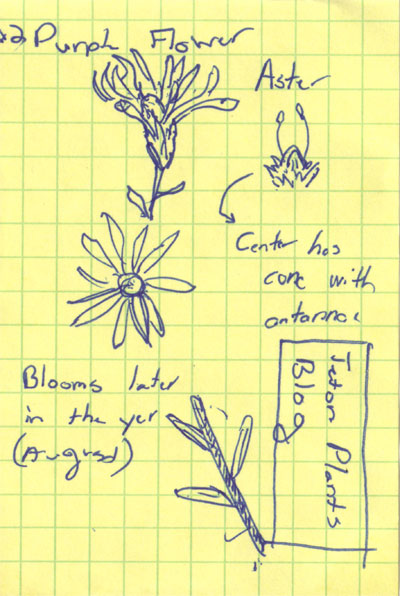
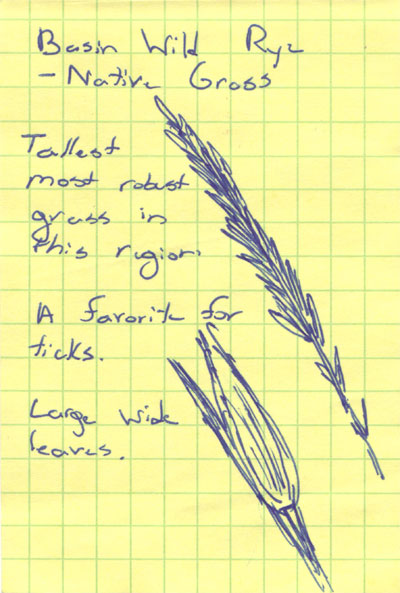
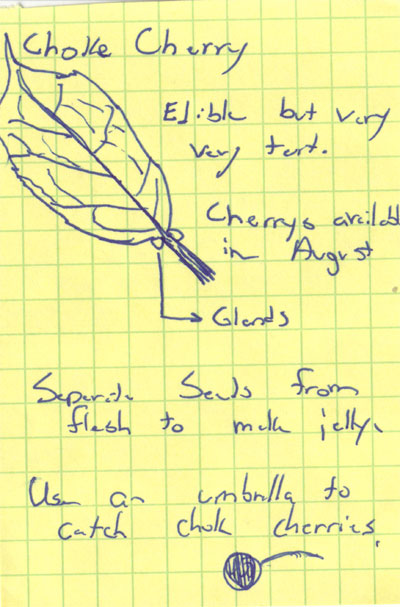
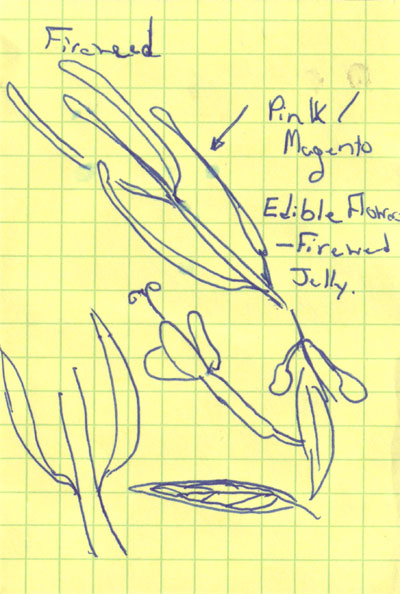
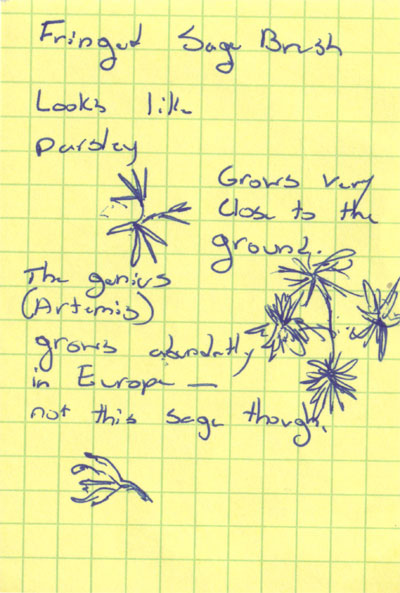
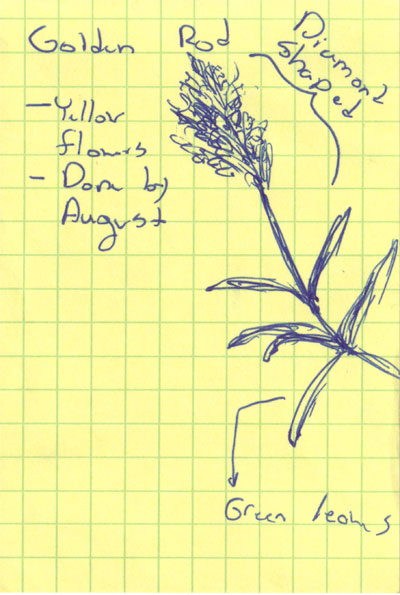
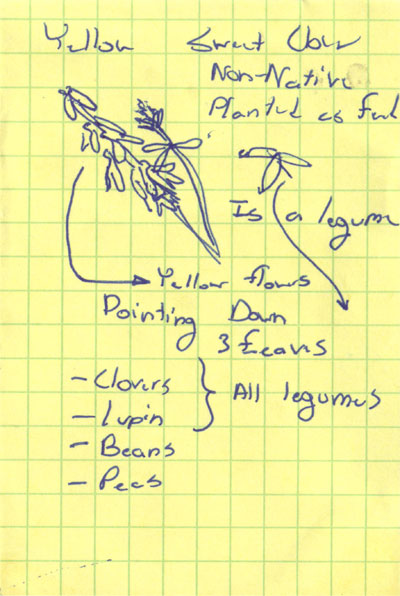
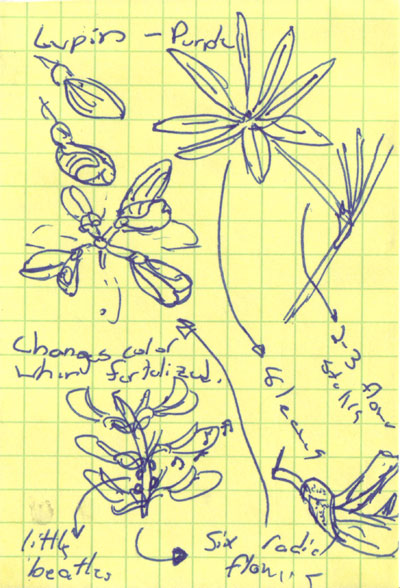
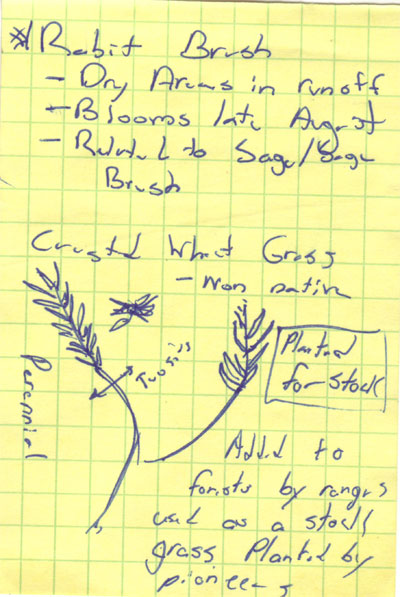
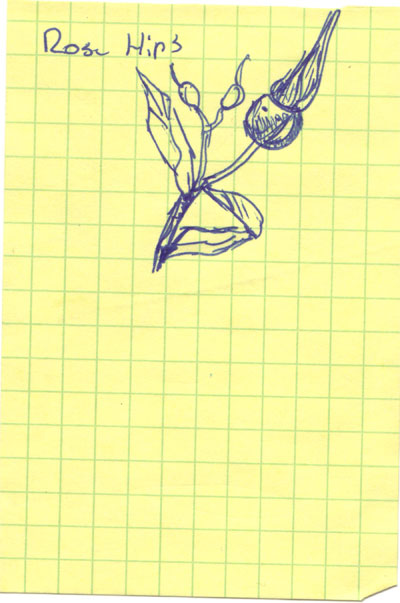
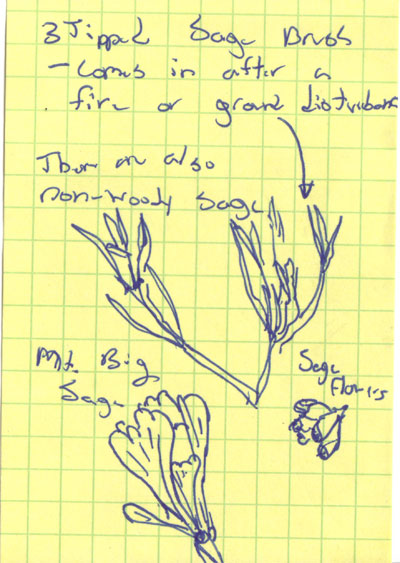
The following sketches are from my field notebook. They were done while taking a
native plants class with Klara Varga in Jackson Hole. In particular, these
plants were all found growing along the roadway through the Elk Refuge.
I have plans on creating what I call the “Raspberry Arcade” – a Raspberry PI
with emulators to play all the old NES and Atari games of my youth that don’t
work. This is just an amazing mod of a game boy and Rasberry PI into one.
I think a theme for myself this week is really inter-operable protocols. These
two articles really belong together since they are both discussing the
essentially same thing. A transition from an internet where we paid for our
services – email, hosting, premium access – to an internet where we are spied
upon and monetized. I don’t really know how we could get back to the “old”
internet of desperate home pages, fan pages, and self-curated, self-hosted
sources where the author pays to host not because they want ad revenue but
because they want to share their particular passion with the world. What other
medium allows such a broad audience with the only gateway being a $5/mo VPS?
This is a new series I’m thinking of creating. It’s more for my use than it is
for anyone else. A weekly list of all the blog posts, articles, videos, etc.
that I uncover through the week that I found interesting or worthy of sharing.
An excellent look at how bootstrap is in some ways a regression back to
table-based html and away from semantic html. This is something that has always
bothered me a little about bootstrap – just how much it looks like a recreation
of tables.
Granted, I’ve solved the problem by breaking the page up into views and
composing them using PHP. The un-semantic bootstrap goes into “layout” level
view which in turn loads semantic views that are free from the bootstrap’s
representational classes. The result is that I can change out the layout views,
or remove them entirely to get a semantic html document or swap out the CSS
framework without impacting the semantic views. This might be a good topic for a
new article.
I love how programming tends to inspire people towards reflecting on Eastern
thinking. It is true that programming is a very meditative activity. The Tao of
Programming, I just found this week, but I’m also adding the Codeless Code since
that is a site that I do like to begin my work days.
Being in the Midwest, I stopped really paying attention to the West Coast’s tech
environment. It simply didn’t feel like something that would involve me much.
Now that I’m out in Jackson, I’ve really started to put my mind towards thinking
more about the West Coast tech and what it would mean to get involved in it.
I don’t think I really noticed this effect until I moved to Idaho. The Dakotas
are such a vastly educated group for their rural upbringings. Sioux Falls is
overflowing with degree holders. Something like 80% of my high school class went
on to college. Going on to college was something that I just assumed everyone
did and that the majority of people had at least some collegiate experience. Not
so in Idaho, it was a complete inversion. Most people just finished high school,
if they had any college experience is was for an associates not a Bachelors or
graduate degree. Suddenly, my typical “ice breaker” small talk of where did you
go for school, what as your degree in, etc. was completely useless.
This seems so true about web programming. I have met far too many people who
think installing wordpress (or the CMS du jour), editing config files or xml is
the height of development. I fear that I am just a marginal step above that with
my frameworks, high-level scripting languages, and package list libraries. Over
time, it seems like there is less and less of a distinction between the
programmer as scientist and the programmer as technological bolt turner in the
modern assembly line.
Kathryn Hemmann’s Contemporary Japanese Literature blog is a new addition to my
RSS feed. I love her assessment of Sword Art Online, and I’m amazed that series
has gone on to produce a second season. I could hardly stomach watching the
first six episodes.
I must be honest: I haven’t read through this entire article yet. But the first
few paragraphs just seem like a wealth of information about architecture and
Americana-tiki.
God, do I love the work of Massaaki Yuasa. Enough that I might even be tempted
to order this from Japan. If you don’t recognize the name, you probably will
recognize the anime: Tatami Galaxy, Kaiba, Cat Soup all three on my list of
must haves for anime. I haven’t started watching Ping Ping (maybe next week),
but from what I’ve heard, it should live up to the hype.
North of the open dunes is North Juniper Hill, the tallest of the St. Anthony
Sand dunes at 6,625 ft and a rise of roughly 1,000 feet above the surrounding
fields. It’s sandy all the way up to the top. We took two days backpacking, this
photo is a cropping of a 360 degree panorama of 21 stitched images.
The St. Anthony Sand Dunes west of St. Anthony, Idaho are perhaps one of the
hidden gems out here. It took us almost a year to bother checking them out due
to all the talk of ATV use. It is true, the dunes are infested with ATV droning
on, but by late evening it seems like they die down and leave a little peace and
quite. The dunes themselves are quite impressive, we thought we would be seeing
some small dunes or patches of sand, instead we found massive open dunes rising
300 feet above the nearby potato fields. The one on the right measures out at
about 320 feet and took crawling on our hands and knees to ascend to the peak.
Were to begin? This post is a kind of smörgåsbord of random thoughts and musing
regarding editing and creating documents. It all really began when I started
contemplating learning LaTeX, which lead to a good deal of time spent thinking
about what is a document and from there to extrapolating much of the
best-practices for web development into a wider sense. Namely, that a web page
is merely a marked-up document and that the principles of separating style from
content ought be considered in our document processing.
I think that Allin Cottrell says it best: Word Processors are Stupid and
Inefficient. This is something,
that I think anyone who spends a good deal of time editing text begins to
realize. I recall long hours in college editing work cited lists to carefully
format them into their specified manners. Even more, I recall hours writing long
form Dungeons and Dragons Adventures to submit to Dungeon Magazine and all the
pedantic formatting that it required.
Not surprisingly, early on in my computing, I had turned to various forms of
mark up for my writing – HTML, simple text files, anything at all to just get
away from the mess that was the Word Processor. It seems that I was on to
something, even though I was unaware that the problem of separating content from
the issues of styling (or more properly: typesetting) had long been a solved
problem.
If I were to paraphrase Cottrell’s points about the disadvantages of Word
Processors and advantages of typesetting it would be:
Text editing allows us to focus on the content and leave stying for latter
(Which is often a solved problem if your content is going on a website or
submitting to a publication)
With separate concerns we can use software like Pandoc to export our text
file into LaTeX, PDF, Doc files, HTML, whatever use we want in whatever
style that pleases us without needing to go back and edit the content
itself.
Text is pretty much ubiquitous, it works on nearly every computer and is
resilient against file corruption.
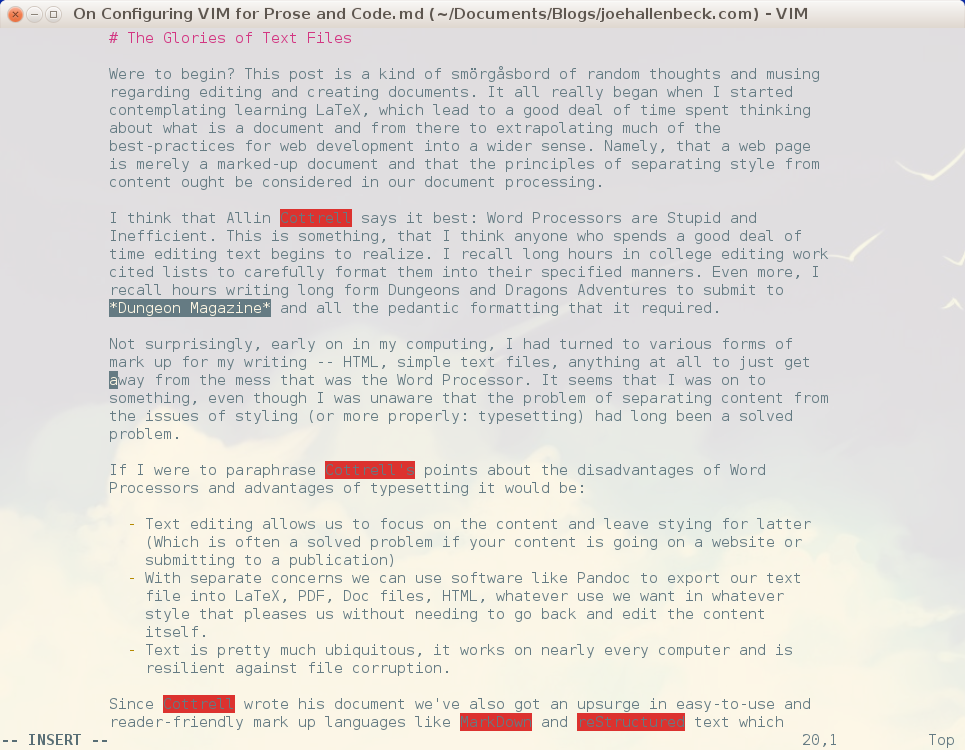
Since Cottrell wrote his document we’ve also got an upsurge in easy-to-use and
reader-friendly mark up languages like MarkDown and reStructured text which
allows us to create text files that are readable as both a text file and
exportable into a format that can be compiled into a beautiful print document
via LaTex. In fact, this entire blog is done in MarkDown and as of late, I’ve
turned to writing my articles as separate text files in VIM and just uploading
them to WordPress after the fact.
VIM
Enter VIM, my text editor of choice. Sublime seems to be getting a lot of
traction amongst my fellow developers, but as far as I know Sublime still lacks
terminal support – so I stick it out with VIM. That said, I really only started
to master VIM about a year ago. Before then, my interaction with VIM was limited
to random encounters changing configuration files on production servers. At the
time, I only really learned the bare minimum to get by – how to open a file,
get into insert mode, and save.
A year ago, I decided I really needed to try to master VIM. So I sat down and
did the various tutorials. Made cheat sheets. I got decent at it, but not
perfect. Right now, I’m refreshing myself and I’m setting a goal of setting
aside NetBeans for my next project to do it all in VIM as well as officially
tossing the Word Processor for writing my prose in VIM as well.
For those who want to follow along, I’ve created a public git
repository with my VIM
configuration.
VIM for Code
If I plan on developing an entire website with just VIM, then I really need to
get VIM tweaked out to do exactly what I want for development. Now, I read a lot
of tutorials, but I found Mir Nazim’s “List of VIM Plugins I Use with Mini
Tutorials” to be a very good
start.
I think the take aways from Nazim’s article are:
Install Pathogen. This is pretty much the go-to package manager for VIM
plugins.
Put your ~/.vim directory into a git repository. Move your ~/.vimrc into
your ~/.vim directory and then create a link to it. Get this set up on all
the machines you work on and then you can easily sync any change to your
configuration across all of your platforms.
Use git submodules to manage all of your VIM plugins.
The Plugins
For myself, I use the following plugins in my VIM install currently:
This combination creates two new key bindings. First, we can now hit Ctrl+t to
open a new tab in VIM. The second allows us to hit Ctrl+n to pop open NERDTree
so we can navigate around the file system and select files to open. A quick
note: in NERDTree pressing Shift+t opens a file in a new tab. An extremely
useful shortcut to know.
syntax on
filetype on
filetype plugin indent on
let g:syntastic_check_on_open=1
let g:syntastic_enable_signs=1
let g:syntastic_mod_map = { 'mode': 'active '
  \ 'activeIfiletypes': ['python', 'php'],
  \ 'passive_filetypes': ['html'] }
let g:syntastic_python_checkers = ['pyflakes']
let g:syntastic_python_flake8_args = '--ignore="E501,E302,E261,E701,E241,E126,E128,W801"'
let g:syntastic_php_checkers=['php','phpcs','phpmd']
Supposedly all of this should enable syntax checking and highlighting for Python
and PHP. Python seems to work quite well. PHP, unfoortunately, requires you to
write out the file to see the errors.
Lastly, we want to make word-search a little looser so by default we adjust some
of the search parameters:
set ignorecase
set smartcase
set gdefault
set incsearch
set hlsearch
I will skip the WordProcessorMode and CodeMode commands for latter, for now
let’s skip to the last three lines:
if filereadable(".vim.custom")
    so .vim.custom
endif
These three lines sets up VIM to look for a .vim.custom file in the directory
that it is running from and then essentially append it to the end of our
.vimrc. This allows us to create custom configurations for VIM on a
project-by-project basis.
VIM for Prose
I began this talk with a discussion on why we should use a text editor for
editing our prose. VIM works extremely well for writing code. I am not yet
entirely sold on it being the editor for prose, although I do think that any
prose-text editor had better come with VIM bindings to be worth its salt.
Right now, I am using VIM to write this and will probably be using VIM to work
on a lot of long-length prose. This gives us a number of great advantages:
Files are small
Files avoid corruption. Imagine this, if one byte of this file gets
corrupted what happens? I have a misspelled word. If this happened in a
binary file who knows if it could be recovered.
I can use my programming skills to do such things as incorporate tables via
comma-separated-files, images, or break this out into separate files and
compile them into a larger document.
I can write it using whatever mark up language I want (in this case
MarkDown) and then use a converter like Pandoc to export into nearly any
mark up language or file format.
I can take advantage of all of VIM’s keyboard functions to keep my hands on
the keyboard and my mind in the flow of putting words on paper.
So what have I done to get VIM working for prose? I dug through a lot of
tutorials and even used Vimroom for a while. At first, I loved Vimroom, but over
the course of a week the bugs and poor user interface and the abandon-ware feel
of Vimroom lead me to abandoning it.
There’s a number of bugs that simply annoyed me. For example, the some color
scheme throws all kinds of errors when toggling Vimroom, and quiting out of
Vimroom without toggling it off first requires repeated closing empty buffers to
get back to the terminal. There also appears to break the drop-downs in SuperTab
causing them to appear but only to allow you to select the first item in the
drop down.
So after a week of Vimroom, I set out to roll my own solution. The solution was
to add two commands to Vim – :Code and :Prose. These toggle between the
settings I want when writing code and the settings I want for prose.
func! WordProcessorMode()
  set formatoptions=aw2tq
  set laststus=0
  set foldcolumn=12
  set nonumber
  higlight! link FoldColumn Normal
  setlocal spell spelllang=en_us
  nnoremap \s eas<C-X><C-S>
endfu
com! Prose call WordProcessorMode()
This snippet creates a WordProcessorMode function and then on the last line,
attaches to a command :Prose. Let’s take a look at each line in part.
set formatoptions turns on an umber of important features. With a we set our
text to automatically wrap when it reaches our textwidth values. In this case,
it is 80 characters. Next, w defines our paragraphs as being separated by a
blank line. t sets our text to be automatically formatted to text width and
q allows us to use the gq command to automatically reformat selected text.
Note: you can can use gGgq to select the entirety of a document and reformat
it.
The foldcolumn and highlight lines sets a 12 column margin on the left side
of our text and sets the color of that column to the same as our background.
With spell on misspelled words will appear highlighted, we can tab through the
misspelling via [s and ]s to jump to the previous and next misspelling
respectively. Once our cursor is on a misspelled word hitting z= brings up our
corrections options and zg adds it to our personal dictionary. One addition
makes correcting words so much easier:
nnoremap \s eas<C-X><C-S>
This displayed the spelling correction options in an in place drop-down!
Before we forget. We need a function to turn all this back off again if we
wanted to jump back into code mode:
func! CodeMode()
  set formatoptions=cql
  set number
  set ruler
  set laststatus=1
  set foldcolumn-0
  setlocal nospell
endfu
com! code call CodeMode()
call CodeMode()
This function resets our environment back into code mode, and of course we call
the function on start up as well so we always begin VIM in code mode.
Last: If you, like me, plan on using MarkDown as your prose mark up language of
choice, grab the vim-markdown plugin which gives me excellent highlighting of
the MarkDown syntax.
Vim Color Scheme: Solarize
There is a bunch of color schemes available in VIM via the colorscheme
command, but honestly nothing really beats out the simple, thought out beauty of
the Solarize color scheme.
The problem is getting it to work in the console. You might notice that my
repository does not include the popular vim-solarize plugin. The reason? In
terminal mode the Solarize color scheme breaks horribly.
It took a while for me to discover the solution to this problem: change the
terminal. Granted, this solution requires you to have a desire to have the
Solarize color scheme throughout your terminal experience.
Sigurd Gartmann has a nice
repository on git
hub that, once installed allows for toggling the terminal into dark or light
mode of the Solarized color scheme.
So there you go, a complete walk through for using VIM for both development (in
this case web development) and prose writing. Enjoy.
I was just going through my photos from my return trip to the Southwest which
included Arches, Canyonlands, Escalante, Capitol Reef, and Bryce Canyon. For
some odd reason, I was not in a big photography mood despite loading up all of
my equipment. I left my camera behind on the backpacking portion and only
stopped to quickly snap a few panoramas along the way. I’ve included those
panoramas below. I find myself wishing that I had taken more time with them.
Perhaps with a little more editing in post, I could bring them out.
I decided to spend the last couple of weeks introducing myself to some of the
big MVC Javascript Frameworks that have gotten so much traction over the last
couple of years. I sadly, have found the field littered with frameworks that
happily violate the principle of Unobtrusive Javascript and am wondering – is
there any solid MVC Javascript Framework that is clean and unobtrusive, will I
need to keep rolling my own, or am I just a Luddite?
Unobtrusive Javascript
Now first, I must admit that I feel as though I am a technological Luddite when
it comes to the rise of Javascript. When I started making websites the standard
advice was to keep as much of the document generation on the server-side as
possible and to practice what is called
“unobtrusive”
Javascript.
The idea of unobtrusive Javascript has been a paramount item of good front-end
design. Namely, that you clearly separate your concerns and avoid reliance on
server-side scripts. HTML ought be semantically distinct from style or behavior
and we do this by keeping our markup in one file, our style-sheets in another,
and our Javascript in a third file. We do not inline our styles nor our
Javascript and we try to keep them distinct so that even if the style-sheet or
Javascript never loads the unstyled, un-scripted document is still in a usable
state.
The earlier concept, simply keeping things separated decouples the reliance of
our code on any one element. We can change the markup, the style, or the
behavior of our application without necessarily impacting the other two
elements.
The latter idea is a concept refereed to as failing gracefully. Namely, it is
that we put fall backs into our application such that if the Javascript does not
work, the user can still make use of the web application. There’s a lot of ways
that we can do something like this:
Have an ajax form submit normally if the browser does not support ajax
Add form submit buttons that are hidden using Javascript on load.
Make sure client-side generated content has some kind of fall-back view that
is generated server-side
The list goes on and on, but you begin to get the idea. Vasilis van Gemert has
opened a great
discussion
about arguments against building Javascript based documents and his comments
section is ripe with the reasons that unobtrusive Javascript is still very much
relevant to the day-to-day development of websites.
Obtrusive Javascript is where you get page behaviors and views that are only
accessibly if the client has Javascript support. The result of these websites is
that they are completely un-usable without their supporting Javascript files. We
can see this on websites that:
Only allow a form to be submitted via a Javascript call
Links whose destination is dynamically generated with Javascript
Views that are created by generating and appending DOM elements client-side
rather than server-side
Now, I grant that unobtrusive Javascript can be hard. Sometimes there just isn’t
a suitable fallback. Some times you are running late on a project and the fact
that it runs fine on 99% of the browsers means it’s time to just shove it out
the door and be on your way. However, I do believe it is a good idea to keep the
principle of separating concerns and failing gracefully in mind whenever adding
client-side behaviors to an application.
State of Affairs for Javascript MVC
I will address in some article my own personal solutions to structuring a
Javascript application as well as the challenge of coming up with a solid
framework for addressing UX and DOM manipulation without turning into spaghetti
code or re-inventing the solution with each website. Yet, it is typically a good
idea to go with a community framework in a team environment since it offers a
familiar structure between projects and programmers on a team. For this reason,
I embarked on working my way through some of the more popular Javascript MVC
frameworks to see what they offer and decide which one, if any offers an
unobtrusive solution. My concern is that on a cursory look (AngularJS and
EmberJS) both seem to scatter Javascript snippets throughout the document and in
the latter case invents a whole new template language that it injects into a
script tag. Oh dear.
The only Javascript framework that I have come upon that makes any attempt at
keeping any kind of unobtrusive fallback seems to be Knockout.js. That said, it
is not the sexiest of new frameworks out there.
// This is a simple *viewmodel*functionAppViewModel(){this.firstName=ko.observable("Bert");this.lastName=ko.observable("Bertington");this.fullName=ko.computed(function(){returnthis.firstName()+""+this.lastName();},this);this.capitalizeLastName=function(){varcurrentVal=this.lastName();this.lastName(currentVal.toUpperCase());}}// Activates knockout.jsko.applyBindings(newAppViewModel());
Knockout works by using the data attribute to bind to DOM elements. This means
that if the Javascript happens to fail we are still left with your typical
document with typical document behaviors. Take the above example clip. If the
data-bind attributes are ignored we would still get a form with a first and last
name. Indeed, we could even fill that form in server side by assigning
value="Bert" and value="Bertington" to the first name and last name inputs.
On top of this, there is something about Knockout that just makes sense. It
isn’t as flashy as Angular or Ember. It doesn’t seem to incorporate any new
trendy templating systems, massive API libraries, or require us to create half a
dozen separate Java script files for controllers, models, and parts of views.
I had my first real exposure to the HTML5
Canvas
element this week. It was a fairly fun transport back to Intro to Computer
Graphics and my school days working in C.
Canvas provides a very simple bitmap surface for drawing, but it does so at the
expense of loosing out on a lot of the built-in DOM. I suppose there is a good
reason for not building an interface into canvas to treat drawings created with
contexts as interactive objects, but sadly this leaves us with having to
recreate a lot of that interactivity (has a user clicked on a polygon in the
canvas? is the user hovering over a polygon on the canvas?) up to us to
implement using javascript.
So let’s dive in and see what canvas is capable of doing!
This complete tutorial is available as a
fiddle on jsfiddle.net. Check it out.
Getting Started
Let’s begin with the absolute basics. First, we need the element itself which
is simply a “canvas” element with a specified id that we’ll later use to
interact with it. By putting some textual content inside the canvas element we
give some fallback for older browsers that might not offer canvas support.
<canvasid="myCanvas">Your browser does not support canvas.</canvas>
Now we need to interface with the element itself. This is done using
javascript:
We are doing two things here. First, we are getting the canvas element from the
DOM, second we are getting a context from that element. In this case that
context is the “2d” context which defines a simple drawing API that we can use
to draw on our canvas.
Drawing a Polygon
The “2d” context API defines a number of methods for interacting with the
canvas element. Let’s look at how we can use this to draw a blue triangle on
our canvas:
Recall that pixels on a computer screen are mapped as though the screen was in
the fourth quadrant of a plane – that is they spread out with x values growing
larger as the pixels are placed further to the right and y values growing
larger as they move towards the bottom of the screen. This puts the value 0,0
at the upper left corner of your screen and 25,100 located twenty five pixels
to the right and one hundred pixels from the top.
The first three lines of code can be thought of as moving an invisible (or very
light) pencil around the canvas. The first moves our pencil to the position
25,25 which should start the drawing near the upper-left corner of the canvas.
The second line draws a line down 75 pixels and over and additional 25 pixels.
The third returns to 25 pixels from the top, but 125 pixels from the left-hand
side of the canvas.
The forth and fifth lines simply define the color to fill our polygon with and
to actually do the filling. In this case we passed a hex value for blue, but we
could alternatively used and rgba (red, green, blue, alpha) value if we wanted
transparency.
Adding Interactivity
One thing you will note about our blue triangle: we can not tie off DOM events
to it. The context merely draws on the canvas, but the drawings themselves do
not exist in the DOM. The closest we can do is capture events on the canvas
itself (onClick, hover, etc.). It is up to us to then decide if those events
were just interacting with the canvas or whether they should are interacting
with something drawn on the canvas.
First, we must recognize that each position that we move or draw the context to
is a vertices.
PNPOLY
is our solution, and to be honest, I did not come up with this one but found
the answer on Stack
Overflow
PNPOLY takes five variables: the number of vertices (corners) on our polygon,
an array of the X values, an array of the Y values, and the x/y cordinates
where the user clicked on the canvas. Now if we add this to our code and run it
we should see an alert saying either true or false as to whether we clicked
inside or outside of our triangle.
Accounting for Global (Window) and Local Cordinate Systems
It is not easy to see on the jsFiddle website, but we can run into some issues
with mapping between the local and global coordinate systems. e.clientX and
e.clientY map to the document coordinate system not the canvas itself. We
may, in some instances find ourselves needing to map between the local (canvas)
coordinates which begins with 0,0 at the upper-left corner of the canvas
element and the document coordinate system which begins with 0,0 at the
upper-left most corner of the page.
This can occur when our canvas is absolutely positioned or positioned inside a
fixed element. In these cases we must include the offset of the canvas from the
document coordinate system to find where the click is actually occurring:
Note our additions to the first three lines in our function. The first line
retrieves the offset for the position of our canvas from it’s global position.
We then subtract that offset from e.clientX and e.clientY to get the
coordinates of the click in the canvas’s coordinate system.
We might also need to add another variable to our offsets and that is to
account for scrolling. If we have a canvas inside a fixed position element then
we must also account for any potential scrolling that might have occurred. We
do this via the scrollTop() and scrollLeft() jQuery functions:
In fact, we can safely include the offset(), scrollLeft(), and
scrollTop() calls even if we are neither using absolute nor fixed positioned
elements since these values will simply be 0 in the case of a statically
positioned canvas.
Perhaps one of the most scenic diversions from I-90 when driving across
Montana. A turn off at Big Timber and head south arcing along W. Boulder Road
to Livingston. In this instance, I caught a freak ranstorm that was coming down
over the wilderness.
In the spirit of the season, I hope to do a little navel gazing. So, if reading
through a pile of narcissistic schlock wherein I attempt to showcase just how
amazing my life is, read on. Otherwise, it would be best to skip this.
Honestly, I would not blame you at all.
Professionally this year has held quite a roller coaster of changes. I changed
firms, moving over to 44 Interactive. This brought
with it a much wider range of responsibilities and opened doors into expanding
my skills into a avenues that I had not yet explored.
At the new firm, I switched to developing 100% on Linux
(Ubuntu and CentOS). It was a
rocky first month, but now I would never switch back to working in the Windows
environment. I oversaw a major revision of production servers at the new firm,
getting things PCI compliant and automating a lot of processes using
Python and Bash – two languages that I picked up last
spring.
I picked up a lot of new tools with the move as well. I started doing regular
development in Code Igniter, expanded my
knowledge of Lemonstand, and wrote an internal
toolset using Silex. I modernized my front-end
skills – working with LESS, HTML5, and building
increasingly more complex ajax sites with a much more solid understanding of
modular/pseudo-classical JavaScript.
I worked on our custom CMS, normalizing it’s database structures, introducing a
number of design patterns to enhance re-usability, getting it into a
repository, and wrangling out a lot of cruft as it became a leaner, more
focused application.
As for personal projects, I rewrote the templates for my portfolio and
“culture” blogs, moved them onto my own
VPN, started hosting my own e-mail server, and got onto
Linkedin and back into regularly blogging. I started to revise my old
coursework in C and daydreaming of making some small game projects in C/Python.
2013 saw me move four times. I started with a move to a new house in Sioux
Falls on the first of the year. I split my time at that house with traveling to
a second rental in Hullet, Wyoming. In May, the rental in Hullet went away and
I began dividing my time between Sioux Falls and Island Park, Idaho (and later
on another move down the mountain to Ashton, Idaho where I began to telecommute
100% of the time).
All this moving gave me quite an incentive to cut down on my possessions. It is
amazing what a couple years of sedentary life can do for property. When I moved
to Sioux Falls a couple years past, all I owned fit in my trailer. This year,
it took me six loads to haul it all out to Idaho.
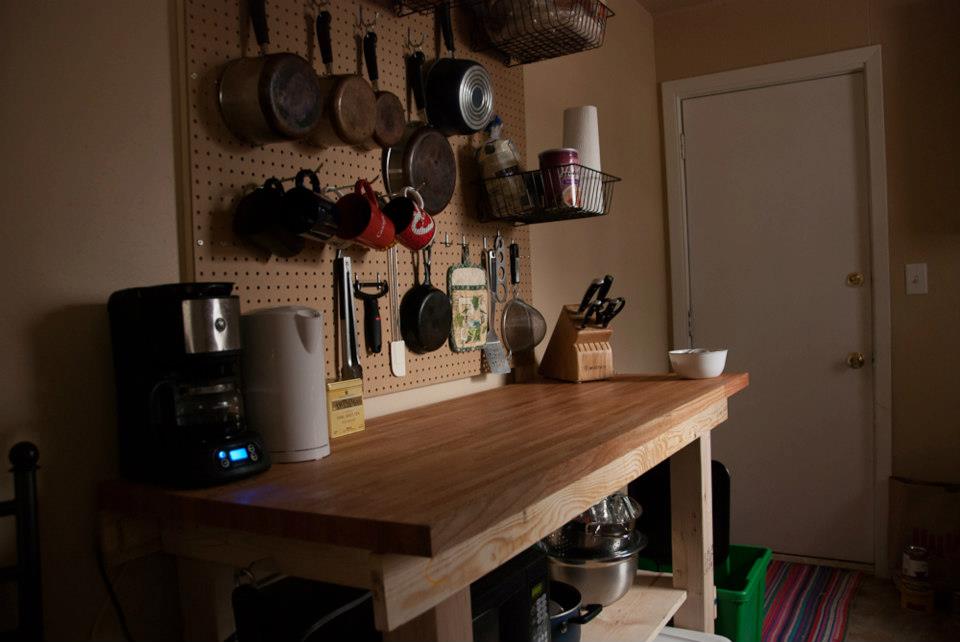
The new house, in Sioux Falls, lacked counter space, so I took this as a
challenge to take up carpentry. I built a fine Oak butcher-block style table
that now resides in my home office as a standing desk.
In Sioux Falls, I made it to figure drawing nearly every week that I was in
town, amassing quite a collection of drawings and
sketches.
In Idaho, I explored Craters of the Moon, backpacked the Jedediah Smith
Wilderness Area, dipped my toes in Bear Lake, explored half a dozen different
day hikes throughout the area, and am now regularly snow shoeing along old rail
road right of ways. All of this resulting in a pile of nature photographs that
I am just now starting to compile and process.
I had a bit of a health scare in Idaho. A false appendicitis lead to all kinds
of new experiences with the American medical system. A sciatica afterwards left
me crippled for nearly a month. In the end, I found myself resolved to get back
into shape by switching to a standing desk and waking early for a heavy dose of
aerobics before work.
I made it a point to try to put 30 minutes each day into reading a text about
computer science, be it a volume on patterns for Python, pointer arithmetic in
C, or artfully designing databases. I feel that I have reached the point where
I just “get” it when it comes to development. I can sit and read across the
field and generally understand the content and feel confident that I can apply
the techniques in the texts without misinterpreting them or misapplying them.
2014 In Resolution
So, I suppose now that I have sat down and covered the many highlights of the
last year I should address myself to the upcoming new year and the good things
that I want to bring about.
I am going to keep reading. I am going to keep putting that 30 minutes of
personal development in CS each day, but I also should set more time aside to
just sit down and game. Two hours for two nights a week and maybe a couple
binges – lets say 160 hours by the end of the year which would put me through
four decently sized games. Now that we’re on the new console generation it is
time to pick up a PS3 and the backlog of exclusive titles along with all the
Wii titles that I let slip.
I hope to pick up a role playing group for one evening of the week, and
challenging myself to finally break down and go to Friday-Night Magic.
I want to challenge myself to bike to Driggs and back this summer (80 Miles). I
would also like to backpack Targhee Peak via Coffin lakes, challenge myself to
complete the backpacking trip to Jedediah Smith Wilderness Area, snow shoe to
Warm River Cabin, canoe Warm River to Snake River, and spend a week backpacking
in Escalante.
The big thing is going to be the projects for this next year. Items, I really
am excited to see. I just have been so busy the last couple of years to really
focus any of my attention on some personal projects other than the occasional
essay.
Pecunia
I’ve already addressed Pecunia in this blog. This is my open-source financial
planner/budget maker built around Silex (although, I am now leaning towards
Laraval4). I envision this as a multi-user website that will allow users to
create budgets, log expenses, and keep track of their personal finances. Oh,
and it will be completely open-source and available for review on my BitBucket
account. (Personal Deadline: Spring 2014)
PyGame
This is a much more vague idea, because I just have not sat down to flesh it
out. I want to sit down and make a small collection of old-school arcade clones
in Python, and slowly work my way up to creating a nicely polished 2D
platformer. (Personal Deadline: 2015)
The Weird Tale
I have this short story that has been in the works for three years. In my day
planner, it’s noted down as “the weird tale.” It’s a Lovecraftian tale of
monsters and madness. I really need to finish it. (Personal Deadline: Rough
Draft Summer 2014, Final Draft Fall 2014)
Blog
It’s nice to be blogging regularly again. This year, I aim for 12 solid
articles.
Architectural Drawing
I have spent the last three years working on figure drawing. It’s time to
return to architectural drawing. Once it gets nice outside, I aim to take the
easel outside and start sketching out each of the buildings in this small town.
Photo Showcase
An annual addition to the list, since I still haven’t done it. I really need to
get a gallery showing put together of my photos. The issue is always that by
the time I have a good enough collection of photos for a given place, I move.
(Personal Deadline: Fall 2014)
NaNoWriMo
I’ve been off NaNoWriMo since somewhere around 2007. It’s time to get back in
there and write a new one. So this year, let’s be serious and put it on the
list.
Inevitably, more projects will probably arise in my mind through the year, and
I will address them as they appear, but for now that’s the whole list.