I have joined in on the recent trend and started my own Digital Garden.
IndieWeb is shifting away from the blog format and a rennaisance has started in
the notion of the personal website. More often this is coming in the form of
Digital Gardens or public zettelkastens. After some research into the topic,
I found the format exhilarating. I have long struggled with the temporality of
the blog format. I desire to go back and edit, prune, and maintain this site.
Yet, the format of the blog post is akin to the newspaper or magazine. It is to
put together a well formed article, published, and then let stand.
Corrections come in the form of new posts, not the retraction or reworking of
existing posts.
The garden then is a different beast. A perpetual work in progress. I plan on
moving pages around. Editing them constantly. Introduce new pages. It is a tool
for my research. Perhaps it will inspire more posts to this blog? Perhaps it
will assist me in getting more side projects out the door?
My garden is powered by Gatsby and is built on the work of Aengus McMillin’s
Brain. I have published the work on Github, as I believe my contribution
will make it easier for others to skin and host their own Gardens.
Now that I’ve gone through my notes on Deep Work it’s time to form a plan
on how to put them into action.
A Deep Work Routine & Ritual
My work day starts with a stand up at nine o’clock every day. My goal is a fixed
rhythmic routine of deep work every day of the week from 10:00 to 14:00. This
gives me an hour after stand up to put out any fires, respond to any coworker
requests and then go into lock down.
The routine looks like this:
Decide on what I will be working on, and get any unanswered questions answered
for the Deep Work session the day prior.
Take care of the needs for all of the pets so they won’t be their own
distractions during the deep work session.
Close out of Slack, Discord, and Thunderbird on the computer. Put the phone on
priority DND and set it face down outside of arm’s reach. Close all tabs not
directly related to the work in Firefox.
Make a full Stanly thermos of coffee so there is no need to brew more during
the deep work session
Meditate for ten minutes before transiting into the session.
At 1400, grab lunch, pause for a thirty minute Internet block to check Slack,
Discord, Thunderbird. Read the RSS feed for the day and catch up on Mastodon.
The last two or three hours of the work day is dedicated to smaller engineering
tasks, research, gathering resources and asking questions for the next day’s
deep work session.
After 1400 we can use productive meditation to contemplate the next steps or
challenges that will require deep work to resolve.
Shut Down Ritual and Relaxation
At 2330 of each day is a thirty minute shut down ritual that casually follows
some of the ideas from Getting Things Done:
Mark all the done items in my bullet journal done in Todo.txt.
Empty all Inboxes into my Todo.txt or calendar. These inboxes might be
ideas scribbled in the bullet journal during the day, e-mails, or tomorrow’s
events in the calendar. If an e-mail can be responded to quickly (less than a
minute) than quickly dash it out to keep it off the list.
Decide on the one thing to be done during tomorrow’s deep work session.
Prioritize the items in Todo.txt, and jot down the items prioritized for
tomorrow in my bullet journal.
Clap and say, “It is done.” Leave the home office, closing the door behind me
and leaving work behind for the remainder of the day.
I sleep at 0200, so this gives me three hours to wind down with reading fiction
or playing games on the Switch.
Elimination Distraction
Do an inventory of your network tools.
Locking down the Smart Phone
The purpose of the Smart phone is (1) a communication device, (2) a GPS
navigator and (3) a music player. Any usage outside of these three should be
circumspect: games, web browsering, and video are right out.
Remove Tusky, Discord, and other distracting chat applications from the phone
Remove the browser from the home screen to remove the temptation to surf the
web when bored
Audit all notifications. Remove all but priority notifications. If possible,
only notify for texts and e-mails from spouse and supervisors.
Locking down the PC
Schedule fixed Internet blocks during the day for network tool use (Slack,
Discord, E-mail, Mastodon, RSS). Right now, this is 1400-1430. For additional
Internet blocks, record in the bullet journal at the end of each block the
next Internet block.
Make a habit of closing out of all network tools – applications and tabs,
whenever I am in the Deep Work session. Outside of Internet blocks, leave
Slack alone open.
Audit the RSS feed each quarter to remove any blogs that haven’t sparked joy
Deep Work suggests doing an inventory of your network tools and identifying if
they substantially positively impact, negatively impact, or little impact
the success of your personal and professional goals.
Looking through my bookmarks, phone, and logs, I come up with the following in
order of usage:
Slack
Mastodon
RSS
Email
Discord
SMS
Voice and/or video phone
Notably missing from my list, thanks to a continuing effort to pair down the
destractions and shallow work in my life over the last few years are Hacker
News, Reddit, Youtube, Twitter, and Facebook.
The first three were rather hard. It’s easy to become caught up in the belief
that keeping up on industry news, watching conference recordings, and reading
about the latest tool (that will never appear in your working stack) is a
productive use of time. I’ve reached the conclusion that reading about a new
tool or technique is only useful if you intend on immediately putting that tool
or technique to use. Otherwise, it’s just another form of entertainment. By the
time you actually need that tool, whatever reading you did on it will long gone
from memory.
Twitter was easy. Twitter was amusing, but ultimately pointless.
Facebook. I still keep an account there. After several years of doing “internet
sabbaticals,” it occurred to me that the only use I have for Facebook is it’s
original use – as a personal rolodex for reaching out to firends and relatives
via other mediums. Liking the latest iteration of someone’s vacation photos is
not maintaining a relationship with them. Calling them, or taking them out to
lunch when you’re in town is. So Facebook sits, and I log into it once a
quarter. It’s draw for distraction entirely broken.
This leaves the remaining network tools and the question: Do they provide a
substantially positive impact on my personal and professional goals?
Slack
Ther are two Slack servers that I am on and while both are for work they serve
substantially different purposes.
There is my dayjob Slack server. Fortunately, my CTO is of a similar mindset in
terms of keeping distraction down. We treat slack as an asychronous channel.
Unless you mention someone, there is no expectation of an immediate response.
Mentions and channel-wide broadcasts are pretty much unheard. We don’t have bots
clogging up the main channels, although individuals are free to add bot for
their own personal distraction.
My second Slack server is {az}Devs, which is a free-based server for the
development community in the Arizona area with a heavy lean towards remote
developers. As a rural developer, {az}Devs is a great way to keep in touch and
network with the Urban based developers. One of my big insecurities of being so
remote is that networking opportunities can be hard to come by and difficult or
expensive to orchestrate.
My current configuration is Slack on phone and computer – but tuned to only
notify or display a visual indicator for mentions. If there are no mentions, I
keep to checking Slack strictly to Internet blocks. {az}Devs are not on my
phone and all notifications there are disabled.
Does it provide a substantially positive impact? Yes.
Mastodon
Mastodon is perhaps my greatest time waster lately. It very much reminds me of
the old web. Small communities, international in scope, but very niche in their
interests. On a small instance, you meet people, learn about their hobbies and
interests. It doesn’t take long to start recognizing a name from day to day and
a community forms around it.
As a remote worker it also serves as a nice water cooler to chat with like
minded hackers about work.
It’s hard to say that Mastodon has a substantially positive impact on my
personal or professional goals. It’s definitely in the shallow category.
I’ve worked on cutting Mastodon down from being too much of dopamine-hit. I
think the big movements are 1) take Tusky off my phone and 2) no more developing
and chatting on Mastodon at the same time during the work day. Keep Mastodon
confined to dedicated Internet blocks.
Does it provide a substantially positive impact? No. Little impact.
RSS
RSS replaced Hacker News and Reddit as my source for industry and entertainment
news. It works much more off the “pull” concept where my reader pulls stories
from a selection of blogs rather than the “push” you see on Social Media news
feed where articles are foisted upon you.
Is RSS an improvement or merely a replacement for Hacker News/Reddit?
Ocassionally, a solid article comes along with truly fascinating information.
Yet, I am often troubled with the notion that I could be spending that time
reading a good book or researching a particular topic that interests me.
I’ve established a handful of rules for adding an RSS feed to my reader. It must
1) not update more than once a day (an exception is made for the local paper),
and 2) it has to pass the Konmari test. That is to say, does the feed spark joy?
When I see that a new post is in my feed does my heart jump with excitement to
read the article? #2 is hard to keep true since a blog might have a handful of
killer articles and degenerate into personnal rambling. Regular culling,
flipping through each feed and seeing if the last few articles sparked joy is
needed.
Does it provide a substantially positive impact? No. Little impact.
Email
Email is the traditional villian in these discussions of distration. Yet, I’ve
never felt too troubled by e-mail. Perhaps it’s a generational thing. I find
inbox to zero and ignoring e-mails rather easy. I do get a couple dozen log
files each morning that takes all of 30 seconds to review. I try to tune Jira
and Github notifications to as minimal as possible. Email is generally useful
for my professional work and certainly less distracting than Slack.
Does it provide a substantially positive impact? Yes.
Discord
Discord, far more than Facebook, has been a great resource for reconnecting with
friends. What better way to connect than over some random shared PC gaming and
voice chat? That almost all of my gamer friends already have Discord installed
makes it an easy excuse to fire up a game.
There’s also local servers for connecting with other gamers in the White
Mountians looking to play board games, roleplaying, and Magic. It’s by far the
best resource for meeting new people with shared interests in my remote mountain
town.
Last, Damasca community, after years of failing to rekindle things over
Minecraft, IRC, etc. has actually congealed around a Discord server, sharing
music, chatting about old times, and daydreaming about ventures in indie games.
Still, it should probably follow the same kinds of limitations as Discord. Not
on the phone, and limited to Internet blocks only.
Does it provide a substantially positive impact? Yes.
SMS
I never really got into texting. I exchange the occassional text with the spouse
through the day to keep abreast of our schedules. On ocassion I text family, but
very rarely. It never caught on with me.
Does it provide a substantially positive impact? Yes.
Voice and Video Conferencing
Voice and Video Conferencing (regardless of the application) are perhaps my
least used network tools but also perhaps provide the highest quality when they
are used.
Work tends to realize that any time spent on a conference calls is time spent
using 100% of a developers capacity. They don’t make these meetings lightly when
an asynchronous solution is available. Hotfixes. Daily stand ups. That’s about
it. That said, I would always be careful of maintaining this high standard of
asychronous first and video conferencing only when it is the best medium for the
problem.
Personal phone calls to friends and family are also high quality exchanges. If
anything, I should make more phone calls.
Does it provide a substantially positive impact? Yes.
Results
So far, with a couple rules in place for avoiding distraction, there are no
substantially negative impacting networking tools in my regular usage. There two
items of little impact that I’ve put some rules around and I think should be
monitored each quarter to ensure that they continue to be either of little or
moving into a positive impact.
As I make my way trhough Cal Newport’s Deep Work, I am thinking about some of
the habits and rituals that I’ve put in place to encourage a habit of deep work
and to stave off burnout in my professional career.
Burnout. Working long hours of low productivity and highly distracted. Carries
on into the evening. Then into the weekend trying to hit deadlines
Solution was to start observing Sabbath. Practice that I haven’t been too good
of as of late. for me, Sabbath means disconnecting from my work in pursuit of
leisure. In this regards, Friday at twlight, no matter where I am in my work.
I put my phone on the desk, turn off my monitors, walk out of the home office
closing the door behind me and not go back in until Sunday morning. Free from
the tyranny of the desktops, laptops, and cell phone – I focus my Saturday
on reading dead-tree books, playing games on the switch, watching movies, and
hiking. The goal is both to avoid work, the internet, reading about work, as
well as any non-leisurely chores (yardwork, house cleaning other than tidying
up messes made on Saturday itself, finances/bills, planning or even thinking
about work). Cooking is leisurely.
Lately, my schedule has a hard stop on all work and chore related activity at 2300.
Since I bed at 0200, this gives me three hours to unwind with a regiment of
reading fiction and playing on the switch.
PC gaming is problematic. Since I want to get off and away from the computer
in my leisure time and yet also enjoy playing Minecraft and the ocassional
FPS. But nights in which I play a PC game become days in which I sit in front
of my computer for 12 hours. Console gaming, I’m forced to admit at least
moves me into the living room, and gives me an interface other than a
keyboard. It no longer feels like an extension of work.
Here’s my 2019 reading list for tech and career focused improvements. Guaranteed
to change the minute that I wrote it down. A handful of these are good books
that I’ve already read and need to revisit like Domain Driven Design,
Implementing Domain Driven Design and The Go Programming Language. Others,
have sat on my shelf for a long time unread (Code Complete 2) and are due for
a second attempt.
Last year, I was able to check learning Ansible and Docker off my todo list. I
feel rather comfortable with both at this point. Yet, the world of web
development ever marches onward. Here is what I would like to focus my attention
on getting up to speed on this year:
React & Modern Javascript Development
Go for Web API Development
Godot, Solarus or Amethyst Game Engines (have to dream)
In 2016, I wrote about switching back to Todo.txt. At the time,
I outlined the rough system I was using. In the two year’s since, I’ve refined
my Todo list process greatly and wished to share.
The Todo.txt format has a ton of flexibility allowing the user to go wild. Very
few articles out there seem to illustrate how individuals use the format for
themselves. This leaves a lot of stumbling about to create good practice and
habits.
Basic Practices
All tasks must have a project and context and only one project and context
The main todo list represents tasks to be done this quarter. A seperate
tickler list is used for tasks in future quarters.
Always keep the main todo list under 120 tasks.
To reduce clutter, use “project stubs” as placeholders for upcoming projects.
Maintain the project sub-tasks in their own todo lists and import them only
once the “stub” reaches priority C.
Liberally use the recur plugin for daily and weekly interval tasks
Generally avoid using meta-data tags
Doubly do not use due dates. Manage appointments and meeting times in a
dedicated calendar app. Add upcoming appointments to the main task list during
the fortnight review and daily reviews.
Priorities
Use only priorities A-D, and with each having a particular meaning.
Priority A
Tasks I am working on right now, never above three tasks
Priority B
Tasks I will do today
Priority C
Tasks I will do this fortnight
Priority D
Blocked tasks to be priortized A-C when they become unblocked
Everything else is deprioritized, and typically hidden from view.
Projects
Projects both represent ongoing epics whose tasks are completed sequently as
well as generic “grouping” of similar tasks. A few common projects are listed
below.
+chores
By taking the unison of the chores project and different context I can create sublists for housework (ls +chores @house), yardwork (ls +chores @yard) or errands (ls +chores @springerville).
+budgeting
Dealing with anything related to personal finance
+admin
Work related administrative tasks such as filing paperwork, planning meetings, or reviewing tasks
+literature, +games, +films
Representing each form of media
+hike
Details trails and distances hiked
+menu
Identified recipes for this fortnight’s meals
+social
Social outings
+wellbeing
General medical and meditative tasks
+ops
System related tasks
Contexts
Contexts are used to identify where a tasks will probably be done.
@office
Task completed in the home or mobile office, and generally denotes a need for networked computing power, e.g. desktop, laptop, or phone.
@house
Task completed at home indoors
@yard
Task completed at home in the outdoors
@out
Task completed in the outdoors, the wilderness within a half day’s drive
@alpine
Task is an errand, completed in the local Alpine community
@springerville, @reserve, @showLow, @phx, @abq
Task is an errand, completed in one of the larger neighboring communities
Fortnight Review
Every two weeks, I complete a full review of the main and tickler todo lists.
Clean Up
Evaluate all forms of inboxes: kanban, e-mail, phone, calendar. Add upcoming
appointments, tasks to the main todo list.
Clean up dead or dangling tasks that are no longer needed. Then evaluate the
list to make sure the existing tasks conform to my practices. Aggressively cull
tasks, create “project stubs” and move clutter into seperate files.
Prioritize
Create a variety of views of the main todo list. Evaluate each unprioritized
task and determine if I must or should work on that task in the next two weeks
and if so bump prioritization to C.
De-Prioritize
Evaluate all tasks prioritized A-D. Determine if I must complete each task, or
if it can wait. Favor trimming the overall list of prioritized tasks to shorter
to avoid accidentally overburderning a week.
Nightly Review
Every night at 21:00, a cronjob runs the command faketime -f '+1d' todo recur
which appends to the main todo list any daily or weekly recurring tasks.
At this time, I clean out my inboxes noting appointments and meetings for the
following day, and then evaluate tasks A-C, determing if they should be culled,
deprioritized, bumped to another day (C), or bumped to be worked on tomorrow
(B).
Tmux Set Up
I aleays have a “todo” session running in Tmux which when using panes and the
watch add on, I can create a window that shows a variety of always
up-to-date views of the state of my main todo list.
Commonly, I keep a “today” window for referencing my day’s work and a “planning”
window for when I’m planning the next day’s agenda.
Today
The today window displays my todo lists of tasks to be done today. From left
to right we have:
Upcoming Tasks (t watch lsp c-d)
Displays upcoming tasks in the fortnight and blocked tasks
Today’s Tasks (t watch lsp a-b)
Displays my currently active tasks and tasks planned for today
Today’s House Tasks (t watch lsp a-b @house)
Tasks to be done around the house
Today’s Office Tasks (t watch lsp a-b @office)
Tasks to be done around the office
Today’s Yard Tasks (t watch lsp a-b @yard)
Tasks to be done in the yard
Working Pane
Pane not running watch for manipulating the todo list
Planning
The planning window is used during the nightly review of the todo list. It
mirrors the Today list in terms of the Upcoming, Today, and Working panes.
However, the context-specific panes are replaced by project-specific panes
displaying either the breakdown of specific projects (t watch ls +blog) or
for larger projects spread across multiple contexts, the unison of a project and
context (t watch ls +chores @project).
Catherine West gave an excellent closing keynote to Rust Conf on
using Rust for game development which delved into using an ECS at the core of a
game engine and in particular focusing on Data Driven architecture over a more
traditional OOP approach.
What is an Entity-Component System (ECS)
ECS is an inversion of the OOP principals. Rather than workig from a
subject-verb perspective, that is “The Dog acts,” we invert the language to make
the verb promenent: “The Dog is acted upon.”
We do this by removing all data and methods from the “Dog” entity, and focus our
design around verbs: input, animate, render, etc. The verbs are components, the
thing acted upon is an entity which is a type.
This is a kind of Data Driven Programing where the data defines the
implementation details of the business logic rather than the code defining the
available business methods.
What is the Benefit of an ECS
An ECS removes the need to hard-code business relationships between entities
such that rapid prototyping of business logic becomes possible.
This results in:
Building systems where stakeholders can modify business rules on the fly
Building concepts that cross-cut through many objects
Increased agility
Can take advantage of parallel processing
Becomes a replacement of the observer pattern
Cowboy Programming in Evolve your Heirarchy describes some of the
disadvantages of moving forward without an ECS. Namely, a deep heirarchy that is
difficult to manage, and the creation of god-objects to resolve common code
duplication.
Notes on Implementation
T-Machine posits in Entity Systems are the Future that an ECS
is not a programming paradigm but a type of system that exists in a larger OOP
application that solves issues that OOP handles poorly. In practice it becomes
an encoding of our business relationships into either a in-memory RDBMS or atual
RDBMS (depending upon thuroughput needs).
A component, according to T-Machine, is an aspect of an entity. It contains a
bucket of properties that define the entity from that aspect.
A system, according to T-Machine, contains all the actions that can be performed
to mutate a component. A system performs it’s actionas against all entities with
a particular aspect.
Example: We have dog-1, dog-2, dog-3. Each is an entity (in production usage
these would be GUIDs). Each of these entities is entered into the component
table as having the moveable component which pivots to a table defining the
position and velocity. The move system runs, applies velocity to each
component’s position and then updates the position properties.
In practice our table structure looks like:
Component table:
id
identity
name
description
table
1
1234-abcd-efgh
renderable
Render entity
render
2
5678-efgh-lmno
movable
Update pos.
movement
3
9012-lmno-pqrs
destructable
Manage health
destruct
Entity table:
id
identity
1
1234-abcd-efgh
2
5678-efgh-lmno
3
9012-lmno-pqrs
Entity-Component pivot:
id
entity_identity
component_identity
component_props_id
1
1234-abcd-efgh
1234-abcd-efgh
1
2
5678-efgh-lmno
1234-abcd-efgh
2
3
1234-qbcd-efgh
5678-efgh-lmno
2
Finally the component data table (“movement”)
id
pos_x
pos_y
velocity_x
velocity_y
1
10
20
0.5
0
2
30
40
0
1
As an explanation of the above, we have three entities and three components. The
first entity is renderable and movable, the second entity is movable (but not
renderable). Looking into the movement table we see the first entity has an x/y
position and is moving along the x axis. The second entity has an x/y position
and is moving on the y axis.
We can add and remove entities from these tables.
T-Machine also notes that we can have “assemblers” to create various component
quickly by bundling together similar collections of components and naming them.
I do wonder if some factory or abstract factory style pattern fits in there.
Sometime last Winter Nelson Elhage’s essays on using lab
notebooks for software engineering made the rounds on Hacker News. One item in
the early essay struck a cord with me:
Computer scientists are taught to document the end results of their work, but
aren’t, in general, taught to take notes as they go
This seems to be current standard protocol for software versioned with git where
care is taken to currate the repository history. Rather then record every wrong
step and dead-end branch we are taught to prune and re-write the record by
squashing our merge histories. A half-dozen commits showing the history of
iterating on a problem are, in an instant transformed into a single commit as
though the solution sprung spontaneously from the prior commit.
The result is that there is little record of the wrong turns that you took or
the iterative steps taken to disover and correct errors from the initial
design. Without a record of what has already been tried, it is easy to
unneccessarily repeat your own footsteps or forget the reason behind a
particular design call.
How I Use It
I may work with a lot of folks with backgrounds in science, but I myself was not
trained in the discipline. Likewise, most of my work is hardly novel or
experimentive – I make bog standard business software. So the metaphor of an
“experiment” can feel stretched at times.
Digging into the question of what is a lab notebook and how does one keep one, I
stumbled upon an excellent document put together by the National
Institutes of Health. I derrived from it a practice that I started last December
and continue to refine.
What is a lab notebook anyway?
The lab notebook is a bound append-only volume that provides a record of design
decisions, procedures, tooling, observation, and background/reasoning for a unit
of development work. In my case, it is a Leuchtturm1917 bound notebook which
already includes an index, numbered pages, and space to record the date of each
entry.
What it is not: a journal, a record of communication, or a place to compile
standard operation procedures.
What does an entry look like?
Each entry is composed in pen (remember it’s append-only!). I begin a new entry
for each user-story, bug report, or task as I begin work on them. The entries
themselves become intersparsed as they represent the flow of my attention
through the work day. I may take up an entry for a user-story, on the next page
start an entry for a bug, then pick up the user-story again on the following
page.
Each entry must include the following:
The date the work was done
A reference title (to connect together intersparsed entries)
Each entry may have the following sections:
The goal which states in one sentence our desired outcome
A discovery section which states any pre-conceptions and predicates to our
problem.
A design plan which states, given our discoveries, the solution we believe
will resolve the goal.
A test plan which states how we will determine that the design plan has
met the goal
An observation section, which is perhaps the most important section and I
will detail below
A next steps section to highlight any new tasks that may have spawned
from the completion and observation of the prior work
Any given section can contain UML or SQL schema diagrams, prose, or any other
conceivable free-form diagraming of my thoughts.
Observations & Triggers
The observation section is an attempt to keep a running log of the development
process as it takes place. In particular, this section:
Records each step completed in the design plan
Records each deviation from the original design plan and why
Additional discoveries (references, unexpected findings in the code, external
change requests, refinement of the concepts and domain language)
Each test run (both automated and manual), the outcome (both failure and
success), and any changes necessitated by observing the software in action
Once completed, the observation section is often the longest and most useful
component of an entry as it comes to contain both a record of all tests
completed (and implicitly all test branch we failed to examine) and a record of
all design decisions along with the catalyst for making each of those decisions.
I find the observation section is best managed using bullet journal
syntax as I record both notes on discoveries or tests and tasks as they are done
or occur to me in a free form mixed list. Skimming back each morning over the
list gives an excellent view of my thoughts for where I left off the day prior.
However, this only works if I remain disciplined. Thus, it is best to keep a
mental list of “triggers” to activate pausing and updating the observations
section. Mine include:
Every time a design decision is made or rejected
Every time we must reference an external source or look up a section of code
Every time a test runs
Benefits
Largely, I have found that keeping a lab notebook, if done with discipline, has
been a wonderfully beneficial experiance as it:
Cuts down on procrastination and time to mentally queue a design after a pause
from a given task since where I left off is plainly recorded
Provides a written record of work for clients, employers, and stand-ups
Provides a written record should a coworker join or take over a task, not to
mention your future self
Reduces the possibility of “retreading” rejected designs or completed test
cases
Encourages continuous refinement and improvement of the design plan through
the course of implementation
Years ago I filed to incorporate a limited liability company. I did nothing with
it since, but now find that I am at the juncture in my career when I should feel
comfortable with taking on and managing client work beyond the stable income of
my employer. This is the natural progression of a remote worker, and while I
have no plans of leaving my day job, diversification in this age is absolutely
necessary.
Kynda Consulting will focus on serving the White Mountain area, by providing
website development and hosting at the local level, and bringing economic
development to the region by enabling larger clients to outsource work to rural
remote freelancers.
Primary services that I will focus on:
SMB custom website design, hosting, and maintenance promoting local business
and nonprofit interests.
Staff augmentation for existing agencies and software products
Workflow and business automation to improve the efficiency of client employees
and “automate the boring stuff”
Consulting services to address client legacy software product issues including
feature additions, bug fixes, feature-complete rebuilds, architecture
road maps, and security vulnerability audits
Consulting services to help existing teams incorporate BDD and DDD techniques
into their architecture and testing strategies
Exploration into identifying potential SAAS ventures that solve SMB needs
Exploration of the production of financially solvent independent games,
middleware, or freelance contributions thereof
This venture will be a new and exciting challenge for myself. It will challenge
me to demonstrate that I can ship a client project (I can), but also to learn
how to land a sale – a skill that I’ve yet to develop and terrifies me.
Continueing my book club notes on the the Pragmatic Programmer by Andrew Hunt
and David Thomas.
Chapter 3
The best way to store knowledge is in plain text, not binary blobs
The drawback to plain text is that it comrpesses poorly, and may be expensive
to process. This doesn’t seem particularly relevant with modern computers, but
I suppose embeded systems still suffer this drawback.
Plaintext helps insure against obsolescence and eases testing
Shell beats GUI
Get good at one editor until it’s like playing the piano
Use source control (yeah we’re doing the obvious now)
Embrace debugging as just another form of problem solving
Turn your ego off when debugging. This is made possible by focusing on fixing
the problem and not assigning blame
Avoid panicing when debugging, accept that the bug is possible, resist the
urge to fix the symptoms while leaving the cause
You can only get so far with automated testing, at times its fastest to simply
interview the user
Rubber Ducking, attempt to explain the problem to someone else, if it’s a
rubber duck
Learn a scripting language (or these days, learn a systems language)
Have code generators actively monitor and rebuild generated code
Chapter 4
We are taught to code defensively and validate against bad input. We should
also be defensive against ourselves
Design by Contract (DBC). Define a contract of the pre-conditions for a method
call and the guranteed post conditions that method promises. Contstraint
invariantss to occuring only within the call itself.
Be strict with the pre-conditions and make only small promises for the post
conditions
Crash early, don’t ignore an error or assume the system will resume stability
once one occurs
Use assertions to guarantee that events that won’t happen can’t happen. Keep
assertions in production to detect these “impossible” events during operation
(you won’t detect these during a normal test pass anyway)
Exceptions should rarely be used as they interupt the program flow.
If you remove all the exception handlers, then the code should crash.
The routine that allocates a resource is responsible for deallocating it.
Continuing my deep dive into shell and editor commands to find, useful tools
that I’m not taking full advantage. This week is the Find and Tree commands.
Find
Find is used for traversing a tree of files and performing some operation on
them. It is one of the core Unix utilities and fairly universal on systems. My
big discovery this time is the realization that I can use find for more than
just searching for files. I can use find to perform operations on the results.
There are multiple actions besides the default -print, e.g. -delete and
-exec both open up a world of possiblities that I would have otherwise
resorted to piping the results into a loop (or resorted to Python) to resolve.
$ find [-H] [-L] [-P] path... [expression]
The flag -P is the default behavior. -L specifies find to follow symbolic
links. -H will follow symbolic links while procesing the command line
arguments. The path parameter is required and can use globbing similar to ls
or other terminal commands.
find excepts a number of operators for fine tuning our search. ( expr )
forces precedence, ! expr evaluates true if the expression is false, expr1 -a
expr2 evaluates expr2 only if expr1 is true, expr1 -o expr2 evaluates as
true if either expression is true. For example:
find . -name 'fileA*' -o -name 'fileB*'
Searches the current working tree for a file whose names start with “fileA” or
“fileB.”
Example commands:
$ find . -name 'my*'
Searches working directory for files starting with “my”
$ find . -name 'my*' -type f
As above, but excludes directories and searches only for “regular files”
$ find . -name 'my*' -type f -ls
As above, but pipes the results into the ls command.
$ find . ../Done -name 'my*' -type f -ls'
As above, but this time we are searching both the working directory and the ../Done directory!
$ find . -name '*md' -o -name '*latex'
Find all markdown or latex files in the working directory
Finds all markdown files in the working directory and executes chmod 664 replacing the value {} with the path to the file. Note the required \; at the end of the command and that the command cannot be placed in quotes.
$ find . -type d -empty -delete
Deletes all empty directories in the working directory. Note, that the delete option can simply be used as a replacement for the default option of -print. That is, whatever whould hae been returned without the -delete is what would be deleted.
$ find . -iname "*MD"
Case insensitive name search
$ find . -size 100k -a -size -500k
Find allows for searching by file size.
$ find . -mtime 30
Find all files modified in the last month. We can do -mtime +50 -mtime -100 to find files modified more than 50 days ago and less than 100 days.
$ find . -cmin -60
Find all files modified in the last hour. find . -mmin -1 does the same thing but with an interval of hours.
Tree
While reading on find last week, I stumbled upon tree. Tree is one of
those commands that I ocassionally recall, think is really cool. Then completely
forget about.
Tree gives you the ability to generate a visualization of the directory tree,
much like the old Windows Explorer provided a tree view of your directory.
In simplest usage, you simple call tree, and it outputs a tree representation
of the current working directory. If we want to display a different directory,
we can provide that for the first argument: tree ~/Documents.
By default, tree displays symbolic links showing where they point towards.
However, if the link is a directory, it does not, by default recurse into that
directory.
Flags:
-a
Display hidden files
-d
List directories only
-f
Display full paths
-i
Don’t indent/show tree lines. Use in conjunction with -f to create a file list
-l
That is a lowercase “L,” do recurse into symbolic directories
-P pattern or -I pattern
List files that match the pattern, or list files that don’t match the pattern
-u, -g, -p, -s, -h
Print the user, group, permissions, size in bytes, or human-readable sizes
Recently, I’ve been running a book club to cover the contents of the Pragmatic
Programmer by Andrew Hunt and David Thomas. One of those volumes that has been
held up, forever, as a text that any good Software Engineer should have read.
The text itself is rather sound, although starting to show it’s age in the era
of software-on-the-browser.
Probably not going to do much of an articulated look at the book. Rather, I
think I will simply post my cliff notes as I, or we go through each chapter.
Chapter 1
Take responsibility for actions, career advancement, project, and day to day
work while being honest about your shortcomings
Understand that responsiblity is something you actively agree to.
You don’t directly have control over the success of things that you take
responsibility for.
You do have the right to not take responsiblity for an impossible task, but
if you do accept responsiblity, then you are accountable for it’s success
Provide options, avoid lame excuses
“Broken windows” in the code encourage the code base to degrade over time
“Start up fatgue” sets in when you make a greenfield request too big. Start
small, and work to larger
Keep the big picture in mind to avoid creep
Software needs to be good enough for the the user; the maintainer, and lastly;
for yourself
Ask the users how good they want their software to be
Great software today is often preferable to perfect software tomorrow
Know when to stop making improvements
Your “Knowledge Portfolio” is your most important asset, but it has a
half-life. Invest in it regularly, manage high and low risk skillsets, and
keep a diverse portfolio
Some ideas to keep on top: learn a new language each year (particularly ones
that introduce new paradigms), read a technical book each quarter, read
non-technical books, participate in user groups and conferences, stay current
on industry trends
You’re communicating only if you’re conveying information. Know what you want
to say, know your audience, choose your moment, choose a style, make it look
good, involve your audience, be a listener, and get back to people
Chapter 2
We are always maintaining software, it is a routine part of the development
process
“Every piece of knowledge must have a single, unambiguous, authoritative
representation within a system” (DRY)
Wrong comments are worse than no comment at all
Keep code orthogonal, that is eliminate dependencies such that internal
changes in a module do not change the external interface.
Orthogonal code reduces risk by isolating bad code, allowing for agile
development, easing tests, and reducing vendor lock-in
Avoid excessive team overlap
When designing architecture, ask if you were to dramatically change the
requirements how many modules must then change?
Develop shy code that doesn’t reveal it’s internal impelementations
Avoid global data
Use the stategy pattern to avoid functions with similar bodies
Do not approach projects with notion that there is only one way to do it
When a critical decision is made it narrows the pool of future possible
decisions; put off such critical decisions until later by making code
reversable
“Tracer Bullets:” start with a small, single aspect of the final system and
complete the piece first. Iterate upon that piece to fully flesh out the
system. Integrate daily, rather than building a single monolith and then
integrating
Prototyping generates disposable code. Stakeholders must be made plainly aware
that a prototype is not a finished product and cannot contribute to the final
production product
Prototypes are creates to analyze and expose risk. They are designed to
explore a single aspect of the software
Use prototypes for things that haven’t been tried before, critical systems,
and anything unproven or experimental
The language of the domain suggests the programming solution
You can implement the domain language into an interpretive language
When estimating use the units of the quote to suggest uncertainty, e.g. a
project doable in a sprint is quoted in days, a project doable in a month or
two in weeks, a project doable in over a quarter, in months, etc.
Continuing my deep dive into shell and editor commands to find, useful tools
that I’m not taking full advantage. This week is debugging PHP using Vim and
XDEBUG.
XDebug in Vim
XDebug has been installed on every development machine that I’ve worked on for
as long as I’ve worked. It outputs wonderfully formatted stacktraces and
var_dump values. However, the interactive debugger side of XDebug remains
little used due to the overhead of setting it up.
When I developed using PHPStorm, the interactive debugger seemed extraordinarily
unstable. After taking the time to set up a project, map the directories
correctly, configure ports and then trigger the debugger it would run for a few
lines then halt. I eventually stopped using it.
The Vim VDebug plugin, running locally on the server seems a much more
stable implementation. However, I still use it much less often then I should.
Largely, this is due to comfort level. I’m not comfortable enough with it, so I
don’t bother triggering it.
Yet, it would be easy to become comfortable. Any time that I want to inspect the
value of a variable under an operations, instead of echoing or var_dumping
that value out – put a breakpoint, and trigger the debugger. After a while, it
will become like second nature to enter the debugger instead of printing the
variable. Consequentially, if after inspecting the first variable, I discover
the need to inspect a second variable, well the debugger has already started and
inspecting the second variable is a zero-cost operation.
Installing and configuring XDebug, I leave to the documentation. Initiating the
interactive debugger is done through VDebug, a Vim plugin that works with PHP,
Python, Ruby, Perl, and NodeJS debuggers – or as it’s documentation says, any
debugger that implements the DBGp standard.
Starting the XDebug Plugin:
Debugging starts by selecting a breakpoint line, navigating to it and pressing
<F10> to toggle the breakpoint. Second, we start the debugging session by
pressing <F5>. We then have 30 seconds to start the session which can be done
in one or two ways.
If accessing our PHP script via the browser, we add
XDEBUG_SESSION_START=$ideKey to the URL query string. If accessing our script
via the commadn line, we start the script via:
Where $ideKey by convention is the unix username and port is 9000 or whatever
port XDebug was configured to use.
Debug controls:
<F5>
Run to next breakpoint/end of script
<F2>
Step over a function or method call
<F3>
Step into a function or method call
<F4>
Step out of a function or method call
<F6>
Terminate script
<F7>
Detach from script, run to it’s normal end
<F9>
Run to cursor
<F10>
Toggle breakpoint
<F12>
Evaluate variable under cursor
When to Step Over, Into, or Out
The step over, into, and out of always tricks me up.
First, contrary to what I thought, you can’t use step-over to step over loops.
They only effect whether you are stepping into, over, and out of function or
method calls. Essentially, if a function is to be called on the line under
evaluation if you step-into it, then we step into the function and debug line by
line that function. If we step-over it, then the debugger executes the function
and takes us to the next line in the current context. Step-out is used if we
first stepped into a function and now want to simply execute to the end of that
function and step back up to the calling context.
One of my professional goals this year is to make a marked improvement on my
shell (zsh) and editor (vim) skills. I know enough commands to get me through
the work day, yet every time I see a real shell or vim poweruser go to town, I am
reminded that I am probably only confident in 10% of the commands that I could
be using.
Every now and then, I’ll force myself to use h, j, k, l instead of ←, ↑, ↓, → to
navigate in Vim and my Tmux panels. The skill lasts about a week before I’m back
to the arrow keys and mouse. Every now and then, I’ll try to expand beyond ls,
grep, cd, cp, mkdir, mv, rm, pwd, clear and cat, in the shell.
I always rebound after a couple weeks, because I can get 90% done with those
nine programs.
Hence, a series of articles summarizing the man pages for different
applications. A process that hopefully sees me making more regular use of them.
Less
My typical solution to navigating a read-only text file is clear && cat
$filename and then scrollback with the mouse or to pipe. My solution to log
files are to pipe them into text files and open them in Vim (not recommended on
memory-limited systems). So my first Unix command for the year is less, that
wonderful program that I get dumped into by Git all the time.
Less is a program that outputs a text file or stream with a buffer to display
either more of the stream or page up to previously output lines.
Less gives me something that I’ve been trying, incorrectly to do with clear &&
cat all along: display a buffer of just the text file. With my old solution, on
long file outputs, it was easy to scroll up past the start of the file and into
old commands. With Less, this isn’t a problem. The buffer starts and ends with
the contents of the text file. Likewise, I frequently output formatted excerpts
from my Todo List using the XP and LSGP/LSGC add-ons and
pipe them into text files or open new terminals to have a clean buffer to scroll
back on. Less solves this by outputing the multi-screen-height output into a
single buffer.
About two years ago I started muddling on a small project to update this blog.
At the time, I felt that there was a need to create something that better
reflected both my growth in design and front-end sensiblities but also my
perspective on how we ought to approach our relationship with the web.
The blog itself has gone through many fine iterations since college. For a
while it served as a platform for attracting employment interest. Now, that I am
established, it is slowly becoming a platform for posting “anything and
nothing” that crosses my mind. The get-me-hired aspects of the blog will
probably be jetisoned onto some new, yet to be made site.
The Website As A Document
The web page is really a kind of virtual typesetting. We take the raw document
in a UTF-8 encoded text with perhaps some simple markup like Markdown, and then
set that document to build a complete html page. Had the medium been different,
say if we were to set to print, then the output could be a PDF, DOCX file, or
even a different markup type (e.g. Latex).
As I have grown as a developer, I have come to the slow realization that the
relational database, while a great back-end for serializing relational objects,
makes a rather poor document data store. Look at my old webcomic, Dreamscapes,
which is currently offline because the CMS it was built upon doesn’t support
PHP7. If we really care about our documents then this becomes a major concern.
In order to edit, view, or generally interact with a document stored in the
RDBMS we must have a full stack of applications that can work together and work
on a given platform. MySQL must be installed and configured to work with the
HTTP server and the HTTP server must support the PHP version of the CMS. This is
a lot to maintain in order to simply read a document. Our ability to archive
and retrieve a document becomes a mounting concern as time progresses. If we
want to retrieve a document that is in such a system ten, twenty, or thirty
years later we may find ourselves first wading through the labourous task of
tracking down and compiling ancient software and virtualized systems just to
read what could have been stored in a text file.
In light of these thoughts, I am moving all of my document-based sites to
static site generators.
The static site generator (in this case Jekyll), respects this idea that an
article on a website is a representation of a document. We can seperate the
repositories of content and layout into two different respective Git
repositories. When I am working on the layout, I can work in programmer-mode and
when I am working on content, I can work in writer-mode.
The article, is thus a document in my documents directory. I can write in it
using the same text editor that I use for any textual document (Vim). I link it
to the Jekyll posts directory to be typeset for the web, or I can run it through
Pandoc to typeset it for print. If I ever wanted to self-publish a book, I could
use these documents as the source to typeset into a series of chapters for an
e-book or volume for Lulu.
Responsive & Simple Design
The new design is no radical departure from my last layout. Overall, I liked the
old layout well enough. Unfortunately, it had a few rough spots: poor display on
phones, the typical wordpress cludge of spaghetti html, and an inconsistent
approach to typography.
The new layout starts with the styles outlined on the Better Motherfucking
Website and then applies a very minimalist layer of front-end frameworks
(Bootstrap and FontAwesome) to achieve a responsive layout that resizes nicely
from desktop to phone. I took great care at implementing the correct HTML5 tags
and stylesheet properties for a rather simple design. The result is that the
site looks good and is fully functional even if we remove the stylesheet. Last,
I carefully reviewed the text blocks possible via Markdown and Kramdown syntax
and crafted a series of test articles displaying a wide variety of ways those
text blocks could be combined. Working through these test articles I constructed
a consistent style that when applied to my existing articles resulted in a much
more readable body of text.
To Comment, or Not To Comment
Comments are gone. Swept away. Lost to some MySQL dump in the back ups
directory. This was a decision that took some debate. I like the idea of a
distributed collection of communities discussing away on some topic. Yet, I am
not interested in moderating and maintaining such a community. These communities
often devolves into a cult of personalty, or which would probably be my case,
abusive flame wars.
In over a decade of writing on the web, I can count the meaningful comments made
on my sites on one hand. When I look at blogs that do recieve some staple
comments with each post, they often become a dialogue between the creator and
questioner with no real benefit to any larger community.
It seems best that discussion about some post or topic be moved into dedicated
communities for discussions, that is Hacker News, Slashdot, or the
healthy collection of smaller bulletin boards that litter the internet. If my
words have moved someone so passionately that they must talk with me, my e-mail
and twitter handles are available in multiple locations on the site. Or if you
wish to rant at me at length, you can always start your own blog.
Kick Big Brother to the Curb
Google in all of it’s various forms is similarly banished. I would still like to
show up in Google searches, but I have no interest in being a platform to
serving up my readers to their big-data engines nor polluting my site with
low-quality advertisements.
Analytics, by itself, seems a rather harmless bit of data collection. I fondly
recall getting my first page-hit counter working on my geocities site over
fifteen years ago. I am still amused to see how many people are reading an
article and their general geographic distribution. Alone, this is just a silly
whimsy, but collectively it becomes a problem. Targeted digital marketing is the
bane of the internet and from it stems an endless flow of poorly written
listicles and click-bait articles by authors principally interested in hitting
the SEO bingo.
Which brings me next to the problem of ads and internet monetization. Shortly
after college I explored the potential of online writing for employment. I found
that the vast majority of online writing is paid for by advertisements and
advertisements provide a most perverse form of incentivisation. The author
quickly finds themselves writing for volume on topics selected for return on
investment rather than passion. The ads themselves bring almost no return, and
clutter up an otherwise nicely looking site while undermining the credibility
and relationship between author and reader. The best writing online is either
passion, paywalled or patronage (be it Patreon or academic).
Thus, analytics has moved to a self-hosted Piwik install. I could get the same
data looking at my server logs, but I do like a nice user interface for my
amusement. DNT honoring, is of course, turned on.
[Patreon][] strikes me as one of the few honest methods of monetization for an
independent creative on the internet. As such, I have set up a Patreon page and
would find it vastly more validating should someone someday choose to donate a
dollar on it then any sum of money that advertisements could draw. That said, I
do not imagine myself putting too much effort into constructing elaborate tiered
rewards or crowdfunding campaigns. Gone are the days that I envisioned a career
as a professional creative. I lack the charisma for cultivating a group of
followers and I lack the focus to become well regarded in any particular niche.
The day job covers me quite well, leaving my creative asperations to follow
whatever path amuses me. Any earnings, I would imagine, would simply be passed
along to other creatives on the site.
Licensing
Last a word on licensing. Dr. Godfried-Willem in The Absurdity of Copyright
points out the futility and logically indefensible hurculean efforts that
industry takes to secure intellectual property. Ultimately, the internet is a
platform for speech and is best suited as a space for promoting oneself and
one’s ideas rather than a marketplace for buying and selling fictitious property
claims. As such, I have placed the source code for this site under The MIT
License and the content of the website under the Creative Commons
Attribution-ShareAlike License.
I am currently undergoing a process of slowly converting this and my other blogs
from WordPress to Jekyll. One of the first items that I needed to account
for was converting all of the posts from WordPress into Markdown for use by
Jekyll.
Jekyll itself provides a process for importing, but I was intially displeased
with the results. I want my posts exported into Markdown files so I can continue
to retain them in a simple plaintext format that can be post-processed into a
variety of typesettings be it online or perhaps a print format. The default
setting only outputs html.
In all honesty, I’m not sure why I’m using Jekyll. The Ruby dependency ecosystem
always seems like such a pain to me. Dependencies not automatically resolving.
Things breaking from one system to the next. But, I don’t really know of any
other big-name static site generators in other languages. I’d do a Python one in
a heartbeat.
So, for my own personal memory. This is the process that I went through to get
my posts out of WordPress and into Markdown:
1. Export Content from WordPress
Wordpress has an export tool when you are logged in to the admin dashboard. By
selecting “All content,” I can get everything from the site in a massive XML
file. This gets us a little closer.
2. Ignore Jekyll-Import
Jekyll has a series of importers for popular sources. It even has two for
WordPress! I tried both with little satisfaction. They take the exported XML
file and spit out HTML copies of our articles. If I wanted to get back to
MarkDown, this would require additional post-processing.
3. ExitWP
I stumpled upon a Python tool that does the trick so much better. ExitWP
takes the exported XML file and converts all of our articles into *.markdown
files.
Follow the instructions to install the dependencies. Dump the XML file into the
wordpress-xml directory and then run python exitwp.py. I found that there
were some linting issues in my XML file that caused it to fail. Opening the file
in VIM and tracking them down via it’s XML linting functionality made it pretty
simple.
4. Copy Your Images Directory
Unfortunately, you are still left copying the images directory and manually
updating the links to images to get things working. This isn’t a major problem
for me as a migration does entail a lot of additional overhead if you want to do
it right – 301 redirects, image updates, cleaning up posts.
In 2013, I was fresh on my switch from Windows to Linux as my full-time OS. I
was reading books like David Allen’s Getting Things Done
and looking for a good digital planning system. Enter Gina Trapani’s
Todotxt script.
Todo.txt allowed for command line todo lists. Every was stored in a plaintext
file, easily editable with any text editor or automated via the command line. I
used it for roughly a year. At the time I both loved and hated using Todo.txt.
On the one hand, it was easily automated. I could set up daily and weekly tasks
to be automatically populated to my list in the morning. I could easily bulk
edit things in VIM.
But there was still some big pain points. My lists tended to get way too long
– scrolled right off the top of my screen. There was no easy way for managing
multiple todo files. There also wasn’t much for sorting. The result was that
managing my lists and getting an overview of everything became increasingly
difficult.
When my employer started using Trello for product management, I saw my
solution. Trello does a great job of visualizing where all my tasks belong.
Following GTD, I had a backlog column, next actions column, today column, in
progress, and done. Moving cards between columns let me visually see the flow
of work through the day. A big tickler board kept all my long-term ideas.
Now in 2016, I find myself re-installing Todo.txt and giving Trello the boot.
Why if it was such an excellent system?
Goodbye Trello
There are a number of pain points that Trello simply cannot get over that
Todo.txt solves easily:
Vendor Lock-in
A theme for a lot of my projects this first quarter of 2016 has been a move
away from Vendor lock in. I got rid of my IDE and switched back to developing
using VIM. This got me to thinking about how many other products I use that
have vendor-lock-in. Evernote instead of just keeping plaintext files. Dropbox
instead of using rsync. And Trello instead of Todo.txt.
With Trello, my done lists, my massive tickler list of project ideas, and my
entire workflow is dependent upon the continued existence of Trello the company
and it’s good graces to continue hosting all of this content for free.
Now Trello does have an export feature, but the result is a massive json blob.
It might as well be binary for as much use as I will get out of it. I most
certainly will be backing up all my trello boards. Yet, if I ever wanted to
make use of this data, I will first need to write some kind of interpretor for
it.
Todo.txt, as a plaintext file manager is to todo lists what Markdown is to Word
Documents. It’s open, interchangeable, can be opened nearly any file system. It
will follow me for year’s to come.
Difficult Automation
Switching back to VIM and working on the terminal all the time made me realize
just how many computing tasks I have left un-automated.
In planning my daily todo tasks there are a number of recurring todos. A daily
stand up starts my work day. A sprint planning meeting occurs every other week.
Duolingo calls my daily French learning session. Monthly bills need to be paid.
On Trello entering these items into my board is a manual exercise. I keep a
second board of “reoccurring” tasks that I copy over at the start of each
sprint. It takes me thirty some minutes just to do this.
Now Trello does have an API, but I would need to learn it, probably create some
kind of developer account, get API keys, compose some sizable application to
interface with that API, make REST calls. It would take me probably a week’s
worth of work to automate that entire process.
With Todo.txt, and a little BASH-fu and a cronjob, this all gets automated
away. Every night my daily tasks get added to my todo, every sprint my
per-sprint tasks get added to my todo. At the end of the month a note to pay my
bills shows up on my todo. This gets offloaded so I no longer need to think
about it.
Task Creation Friction
GUI’s add friction to any task.
Trello is no different in that regard. If I want to add a new task, I need to
fire up a browser, navigate to Trello (assuming I even have an internet
connection), create the card, name it, click a bunch of buttons to add a label.
Sometimes, I just don’t want to do all of this, often times I find that I don’t
sufficiently break a task down into small enough tasks purely out of a
resistance to creating more cards.
Todo.sh, being on the command line means I need no internet connection, I can
simply start typing to add my task, and there is little overhead in truly
breaking any project down into atomic tasks that can be accomplished in a
single Pomodoro.
Hello Todo.sh
After considering these options, I decided to revert to using Todo.sh. After a
week of being back, I find that I love it. I am still working out my system for
using Todo.sh. It truly is powerful. I’ve already discovered quite a few
commands and options that I had no idea even existed before (I never realized
there is a means of doing a logical or for terms or excluding terms via
-TERM).
I could easily write up an entire second post about how to manage todos, how to
install the script, get yourself running, useful aliases and methods for
creating new add ons and automating things. Once I really get my daily system
going, I could probably write a whole post on that as well.
Plaintext Planning
I would highly recommend a read through Michael Descy’s Plainttext
Productivity website as the tips are quite
above board. The biggest take away is priority management. Only use three or
four priorities and use them to management where an task exists in the GTD
workflow:
(A): Tasks that are in progress. Keep this below three tasks at a time
(B): Tasks that I will get to today
(C): Next actions that can be started now. Descy uses this for “Next
Actions this week,” I use it for tasks to be done this sprint.
(D): Descy uses this for “Next Actions next week,” I use it for tasks that
are currently blocked
(E): Tasks that are part of a project currently prioritized as an A, B
or C task. For multi-part projects whose parts I don’t want cluttering the
view when I query for the current day’s tasks, I create a project stub. When
that stub is in progress and I need to know the next part to work on, I can
query for all the E priorty tasks for that project.
Everything else is in the backlog which for me is items to be done this
quarter. Anything further back goes on the tickler to be evaluated some day and
added at my leisure.
Add-Ons & Set Up
A very brief overview of my current Todo.sh set up.
First, I have the todo.txt-cli script installed in my dotfiles repository which
has it’s own script for installing all of my related configuration files on any
system I touch. The todo lists themselves are in their own separate repository
since I don’t manage todos on every system that I touch.
I follow the instructions for setting up auto completion. I also set up a
number of aliases for different todo lists:
todo: for my daily, sprint, and quarterly task list
todot: for managing my tickler list
todos: for managing my shopping list
The aliases use the -a flag since I prefer to not auto archive by default.
Each alias has it’s own todo.cfg file which each sources a base.cfg file
and only exports configurations that are unique to that command. As a base, I
changed my priority colors to Blue, Green, Brown, and Red solarized values for
the A-D priorities. Changed the project color to red and left the context a
nice light gray.
pull and push for quick version control my todo lists.
projectview has some pretty formatting for project lists
recur for automating recuring tasks. I tried the ice_recur module but simply could not get it to work on my system.
xp another task visulation. This time for done tasks.
pri and rm (with a soft link for pri to p as a shortcut) for bulk editing priorities and deletions
lsgp/lsgc another project and context visualization.
Still Some Rough Spots
There are still some rough spots in Todo.sh land. First, sorting is still not
quite perfect. Ideally, if I type todo lsp, I would like to have all my tasks
listed by priority, then line number grouped by project. The best that I can do
right now is by priority and then line number. Project grouping only occurs if
I group the project lines together in VIM.
Secondly, the one big item that Trello had going for it was it’s phone app.
This made adding tasks on the go quite easy and made looking things up easy as
well.
Perhaps some of the various todo apps will have the functionality that I need,
or perhaps I will need to compose my own app to meet my needs. The joy of the
matter is though, I’m not locked in. I can easily develop that app if I so
choose.
This summer, I plunged into the depths of my back up drives and came up with
some old projects that were growing some dust. Like most old projects, I find
them, get excited. Decide to do a major revolutionary revamp, and ultimately
just end up touching up some things and kicking them out the door. The
DropFramework is one such thing. For a long time, I wanted to make my own
micro-framework to compete with the likes of Slim or Silex. In the end though, I
really feel that those two have the space of micro-frameworks very well covered.
No one needs yet another PHP micro-framework with half-done ideas floating
around. Still, I did want to show it off, so I polished it up a little bit and
through it up on github. Below are my thoughts on “Yet Another PHP
Microframework”
Yet Another PHP Microframework
For all intensive purposes, you can consider this an abandoned project and I
would not recommend anyone actually use this in production.
A few years ago when Code Igniter was still quite a hot thing and a lot of
servers were still running PHP 5.2, e.g. the “dark ages” before we got all the
nice things that came along in PHP 5.3 it seemed to be quite the fashion for
everyone to try their hand at writing their own framework.
This was my go at it.
You will find a lot of similarities with Code Igniter (since that is the
framework I worked with at the time) and you might also find a lot of classes
that look like they came straight out of PHP Objects, Patterns and
Practice
since that was my bible.
I wanted to do a few things in writing the DropFramework:
I wanted to better understand the MVC pattern, the choices being made and
how CI works.
I wanted a framework that was small enough that I could read and understand
every class in it.
I wanted a framework with a very small footprint that worked by
transforming HTTP requests into request objects / command objects. This
allowed me to fire up multiple instances of the framework per HTTP request
with the master application generating it’s own request objects that it
would feed into it’s child instances and then construct a document out of
the application responses from the children.
I did not like at the time, and still do not like the major design patterns
of a lot of ORM solutions which tend to treat the database as the
authoritative model of the data. I rather turn this convention upside down:
treat the database as just another form of user input. The model can then
be constructed from any form of input – the database, an HTTP post, a
file. The PHP object is then the authoritative source for how the data
structure relates with other data. Any data coming into the model passes
through a validation layer that translates it (or rejects it if it
invalid).
Whether or not I succeeded at this items? I don’t think I would really know.
Version 0.4.0
The version of the framework that had been sitting on my hard disk for some time
was 0.3.0. In deciding to release it I have done two major things:
I created a simple example of the framework working. The
code for this example is
also up on github and a live
version as well.
I namespaced the entire framework and brought it into PSR-4 compliance
allowing for installation via Composer and the use of the Composer
autoloader. This defeats a lot of the purpose of the PHP 5.2 era frameworks
which devoted a lot of their resources to locating and managing the loading
of assets. This, of course, makes this no longer a PHP 5.2 compatible
framework and probably even makes a lot of the framework look rather silly.
Getting started with Piston can be a little daunted right now. Mostly this is
because it’s a project that is still evolving and which has either little
documentation or documentation that rapidly becomes wrong. A lot of games that I
found made with Piston can no longer be compiled, a lot of example code needs
various minor tweaks to get to compile, etc. That said, the two best items that
I found where:
Piston-Mov-Square Which is
just a very simple program that appears better structured than other
examples
Getting Started
The first hurdle in getting Piston to work was getting the SDL2 and GLFW
dependencies installed. Cargo does a great job of going out and grabbing
everything else, but these two items require you to do it yourself. SDL2 was
rather easy and the instructions for it can be found in the Getting Started
tutorial (see above). GLFW was a bit more of a pain and I ended up going through
a stack
overflow
question to get it working. If anything, I would just point to the Getting
started tutorial to get the initial empty repository set up with cargo and all
the dependencies in the Cargo.toml.
My Repository at this Point
At this point my repository looks like
this
I began by setting up a new Piston project as detailed in the Getting Started
tutorial and from there I copied the code from the piston image
example.
This was just a nice starting point to ensure that everything is working and
that the Rust logo would appear in the window designated.
From there, I began working through the Piston-Mov-Square project and the
Getting Started tutorials and religiously commenting every line of the code with
what it does. This is just something I picked up in college and a good way to
puzzle out foreign code. Even if the comment turns out to be wrong (like it
happened in many cases for myself), it at least is a step in manually dealing
with the code.
I played around for a while and after I felt confident in the code that I had, I
began abstracting it into various data objects and getting down to work.
Hopefully my puzzling with help someone else to understand this faster than I.
An Explanation of the Code
Loading Crates
// Load external crates provided via cargo.externcrategraphics;externcratepiston;externcratesdl2_game_window;externcrateopengl_graphics;// Texture is used for images; Gl for accessing OpenGLuseopengl_graphics::{Gl,};// For creating a windowusesdl2_game_window::WindowSDL2;// Stuff from piston.usepiston::{EventIterator,// Used for the game loopEventSettings,// Struct used for setting and updatesWindowSettings,// Struct defines window configRender,// Render Evemt };usepiston::graphics::\*;usepiston::shader_version::opengl;
We begin by loading all of our various library provided to us by the Piston
developers and which we will use for getting our game window to appear on the
screen. I have yet to figure out what the #![feature(globs)] lint actually
does and if someone does know, I would love to find out since removing it causes
everything to break. The rest of the code is just giving us access to various
libraries that we will use latter on. I have tried to comment those libraries as
best I could since it wasn’t entirely clear what does what.
Config and Main Entry Point
// Config options for the game.StructGameConfig{title:String,window_height:u32,window_width:u32,updates_per_second:u64,max_frames_per_second:u64,tile_size:uint}// Entry point for our game.fnmain(){letconfig=GameConfig{title:"Centipede-RS".to_string(),window_height:480,window_width:800,updates_per_second:120,max_frames_per_second:60,tile_size:32,};// Create and run new game.letmutgame=Game::new(config);game.run();}
If there is one thing that I know it’s to confine magic
numbers. Let them
sprout wherever you please and code maintenance becomes a mess. Hence, I have
taken the various constants for our game and packaged them up into a
GameConfig struct. Right now this struct defines the attributes of our window:
title, height, width, frames per second, and tile size. I imagine that this
structure will probably grow larger as we begin adding in actors, players, and
assets. We will deal with that when the time comes.
I have also created a Game struct (more on it later). The game struct simple
takes a GameConfig and returns an instance of itself. Calling run fires off
our game loop which loops infinitely or until we kill the process. In essence
the Game struct represents and handles the loop. We could leave this in main,
but by turning it into a struct we have the option further down the line of
moving it out into a module which would leave our main.rs file consisting only
of loading Piston, setting the various config items and calling Game.run.
The Game Struct
// Represents the Game Loop struct Game { config: GameConfig }implGame{...}
I’ve seen this simply called App, but since we are making a game, I think it
should be Game. The Game simply holds the game state and runs the game loop.
Inside it, I have added several methods via impl: new, run, window, and
render. New and run are our public methods which we have already seen. One takes
a GameConfig and returns a Game. The other starts the game loop. The
remaining methods are just there to run the internals of the loop itself. Let’s
walk through each method:
// Returns a new game structpubfnnew(config:GameConfig)->Game{// Return a new GameGame{config:config,}}
Game.Run
This one is rather simple. It is a public function (pub fn) named new. We can
access it via Game::new(). It takes a GameConfig and returns a Game whose
config property is config. I am sure I am mixing a lot of OOP language here,
but after years of working in the realm of PHP that’s just how I end up
thinking.
// Run the game loop pub fn run( &mut self ) {letmutwindow=self.window();...}
Run is a little messier it fires off our game loop. It takes a mutable copy of
itself which allows us to access it on an instance of Game e.g. game.run().
The first line it calls is to a member function window():
// Returns a window.fnwindow(&self)->WindowSDL2{// Values for Window Creationletwindow_settings=WindowSettings{title:self.config.title.to_string(),size:[self.config.window_width,self.config.window_height],fullscreen:false,exit_on_esc:true,samples:0,};// Create SDL WindowWindowSDL2::new(opengl::OpenGL_3_2,window_settings)}
This is not a public function, thus when we turn Game into a module it will not
be accessible outside of the module file. We are using this essentially as a
hidden or private method on Game. The window function is accessible from
inside a game object via self, e.g. self.window(). We really only need one
window, so this method is only called once at the start of the run method.
Window returns a WindowSDL2 which is our back-end we loaded way above at the
start for managing our windows. This window takes a WindowSettings struct
whose values we pull out of the GameConfig stored in our Game. Either way,
it makes a new WindowSDL2 and passes it back to the run method. Now back to
our second line of the run method:
// Get Gl let ref mut gl = Gl::new( opengl::OpenGL_3_2 );
Now this took me a while to figure out. The call to Gl::new() must come
after the creation of the WindowSDL2. In an earlier version of this I had
the call to create GL after the call to create the Window. The code will compile
fine if you create GL first and then the Window, but when you run it you will
get a CreateShader error. I only solved this by stumbling upon an IRC log.
Anyways, hold on to that gl variable since we’ll be passing it around a lot.
// Create Settings for Game loopletevent_settings=EventSettings{updates_per_second:self.config.updates_per_second,max_frames_per_second:self.config.max_frames_per_second,};
Rather boring. We need to create and EventSettings object to pass into our
game loop.
// For each e in Event Iterator (whose range is 0 to infinity) // e becomes a new Event by passing our window and event settingsforeinEventIterator::new(&mutwindow,&event_settings){// If e is Render(args) do something, else return ()?matche{Render(args)=>self.render(gl),_=>{},}}
Here is the magic! The game loop. I really like how this works in Rust. Since
iterators can go from 0 to infinite we take advantage of it. The EventIterator
takes the window and event_settings variables we set up earlier and returns
something (I don’t know what) which is put into e. We then do a match on e
to see what was returned. Right now there are only two things that can match: a
call to render the screen, or everything else. Looking at some of the example
code, I do see that we can catch all different kinds of events – user input,
calls to update the game state, etc. but for now we are just concerned with
rendering the screen. So we get a render event (Render(args)) and we call our
private method render via self.render and pass in our gl variable (I said
we would be passing him around a lot).
Game.Render
// Render the game state to the screen.fnrender(&mutself,gl:&mutGl){letwidth=self.config.window_width;letheight=self.config.window_height;// Get number of columns and rows.lettile_size=self.config.tile_size;letnum_cols=widthasint/tile_sizeasint;letnum_rows=heightasint/tile_sizeasint;...}
Render simply takes a mutable reference to Gl and paints to our screen. The
first two lines just get the window_height and window_width out of our
config since we will be using them a lot in this method. Since this is going to
be a tiled game we need to know how many columns and rows of tiles we will be
drawing. So I calculate that here by dividing the window’s height and width by
the tile_size.
// Creates viewport at 0,0 with width and height of window.gl.viewport(0,0,widthasi32,heightasi32);// graphics::context a new drawing context (think html5) letc=Context::abs(widthasf64,heightasf64);
The next two lines in our render call do two important things. First we set our
view port to start at the cordinates 0,0 and to extend to the width and height
of our window. Second, we get a Context which I like to think as our virtual
pen for drawing on our canvas. In fact, the first thing we do is fill the entire
canvas with white:
c.rgb(1.0,1.0,1.0).draw(gl);
This takes an rgb (red, green, blue) value that sets each to a 100% (or white)
and then draws this to our window by calling draw and passing in our old friend
gl.
Now let’s have some fun. Just to show that we are indeed drawing on the window,
let’s fill the window with 32x32 pixel tiles each one slightly reader than the
last. The effect should look like this:
We begin by setting our starting red value:
letmutred=0.01
This needs to be mutable since we will be adding to it with each iteration of
our rows.
Second, we loop through each row and each column drawing a red square the size
of our tiles:
// Fill screen with red one 32x32 tile at a time.forrowinrange(0i,num_rows){red=red+0.02;letrow_shift:f64=rowasf64*tile_sizeasf64;forcolinrange(0i,num_cols){letcol_shift:f64=colasf64*tile_sizeasf64;c.square(col_shift,row_shift,tile_sizeasf64).rgb(red,0.0,0.0).draw(gl);}}
What does this do? First we are looping through our rows from zero go num_rows
(we calculated the number of rows earlier). On each row we adjust our redness
slightly this should make each row more red than the last with the first row
being fairly dark. Next we calculate row_shift this is simply done my
multiplying what row we are on by the size of our tiles. This will be used to
tell the context to move down 32 pixels when it gets to row 2, and down 64
pixels when it gets to row 3 and so forth. The inner loop does the same only for
our columns. We loop through each column and calculate our col_shift or how
far to shift to the right for each column. If I recall correctly this is the
most efficient way to loop since the screen paints outwards from your upper-left
corner. Finally, we draw our square. The context (c) knows how to draw squares
so we pass into it the coordinates of the upper-left corner of our square
(col_shift, row_shift), the width of our square as a float (tile_size),
instruct the context to fill this square by calling rgb( red, 0.0, 0.0 ).
Note, we passed in our red variable so the redness of the tiles should adjust
as the red variable does. Last, we draw the square by calling draw and once
again passing in gl.
A rather rambling design document for my ideas for a Centipede
clone that I’m releasing under
the MIT license. Following all my reading in Rust it
seems like a good idea to have some kind of project to complete. After
scrounging about for ideas, I came up with the one of doing an open source
centipede clone using Piston. This would be good
practice for trying a Rust Ludum Dare next April.
The following is more or less a rambling stream of consciousness design doc for
what I’m about to do. I’ll probably follow this up with a series of other
entries about the steps and break down of the code as I go.
Concept
A Centipede clone done in Rust using Piston with perhaps some additional flavor.
The core idea of the game is to have a gridded window of size X and Y with a
centipede that begins with one segment that grows as the game progresses. The
centipede moves continuously in the last cardinal direction specified by the
player. As the character moves it encounters various items randomly populated on
the screen. Upon contact some effect occurs such as adding an additional
segment. If the user comes into contact with itself (such as looping back around
on it’s own tail). The game ends or some failure condition occurs.
Objects in the Game
The Game
Well of course it’s an object unto itself. The game represents the game loop.
The Board
The board is 800x480 and divided into 32 pixel squares. At start of the game and
at a fixed interval actors are randomly assigned squares on the board.
Centipede
The centipede has the following characteristics:
Collection of Segments
Who each have a position and sprite
Who each have a direction (Each moves in the direction of the segment before
it except the head segment which moves in the last direction input by the
player).
If a segment intercepts another segment it destroys it. The severed segment
then becomes bombs.
Number of mushrooms eaten (Used as a score)
Actors
Actors specifies an indescriminate number of items placed on the board that the
centipede interacts with when it comes into contact with them. The actors need
to be able to expand to include new actors with new effects.
Sprite
Board position
An affect
Right now we have two actors: mushrooms and bombs. Mushrooms are placed randomly
on the board at a fixed interval. Bombs are segments that have seperated from
the centipede. They each have an affect. Mushrooms cause a new segment to be
added to the centipede after X mushrooms have been consumed. Bombs cause the
game to immediately end.
I just started delving into Rust last week with the release of the Rust Guide.
In Web Development, I really have moved away from the “bare level” languages of
my schooling into the flighty realm of scripting languages. For the most part,
I’ve been quite satisfied to leave behind the rigors of memory management and
obtuse C linking errors for PHP, JavaScript and Python.
Yet, Rust is the first systems language that really has gotten me excited to sit
down and try it out. Maybe get back into the indie game scene (which I have been
saying forever).
This post is going to be updated semi-regularly as just a continuing list of
Rust resources worth looking into:
TimeKeeper is a little utility
tool that has become both a pet project for testing out new PHP and JavaScript
tools as well as a very useful tool that I use every day to keep track of my
billable hours, projects and tasks that are completed through out the day. An
example of TimeKeeper in action can be found at
timekeeper.kynda.net
This week, after a year of dormacy, I updated TimeKeeper to v0.1.1 with a major
internal refactoring and improvement in the interface’s “responsiveness.” Major
improvements include:
The UI is now 100% responsive thanks to a rewrite of all templates to
Bootstrap3
Libraries now install via bower and composer
Moved database configuration into a seperate config.php file, this along
with the bower and composer updates makes installing TimeKeeper much easier
100% Documentation of all interfaces and files used by TimeKeeper
Future Plans
TimeKeeper’s direction is still rather vague. This is a useful tool for a single
user to keep track of their own time. I am not yet sure if I want to keep it
focused on being a planning tool for a single user or to expand TimeKeeper into
a team-based tool.
The single biggest issue with TimeKeeper is that it does not provide a
password-protected user log in which means that it cannot be public-facing or at
least ends up relying on apache for user-login.
v0.2.0 RoadMap
For v0.2.0, which will be released “whenever,” I plan on adding the following
features to TimeKeeper:
Single-User Password Log In (so the site can be public-facing)
A Reports table that generates a variety of charts analyzing the filtered
time frame including: break down of 100% time spent per project or billable
hours; daily break down showing hours worked and whether they went over or
under 40 hours; Perhaps a monthly report as well.
Were to begin? This post is a kind of smörgåsbord of random thoughts and musing
regarding editing and creating documents. It all really began when I started
contemplating learning LaTeX, which lead to a good deal of time spent thinking
about what is a document and from there to extrapolating much of the
best-practices for web development into a wider sense. Namely, that a web page
is merely a marked-up document and that the principles of separating style from
content ought be considered in our document processing.
I think that Allin Cottrell says it best: Word Processors are Stupid and
Inefficient. This is something,
that I think anyone who spends a good deal of time editing text begins to
realize. I recall long hours in college editing work cited lists to carefully
format them into their specified manners. Even more, I recall hours writing long
form Dungeons and Dragons Adventures to submit to Dungeon Magazine and all the
pedantic formatting that it required.
Not surprisingly, early on in my computing, I had turned to various forms of
mark up for my writing – HTML, simple text files, anything at all to just get
away from the mess that was the Word Processor. It seems that I was on to
something, even though I was unaware that the problem of separating content from
the issues of styling (or more properly: typesetting) had long been a solved
problem.
If I were to paraphrase Cottrell’s points about the disadvantages of Word
Processors and advantages of typesetting it would be:
Text editing allows us to focus on the content and leave stying for latter
(Which is often a solved problem if your content is going on a website or
submitting to a publication)
With separate concerns we can use software like Pandoc to export our text
file into LaTeX, PDF, Doc files, HTML, whatever use we want in whatever
style that pleases us without needing to go back and edit the content
itself.
Text is pretty much ubiquitous, it works on nearly every computer and is
resilient against file corruption.
Since Cottrell wrote his document we’ve also got an upsurge in easy-to-use and
reader-friendly mark up languages like MarkDown and reStructured text which
allows us to create text files that are readable as both a text file and
exportable into a format that can be compiled into a beautiful print document
via LaTex. In fact, this entire blog is done in MarkDown and as of late, I’ve
turned to writing my articles as separate text files in VIM and just uploading
them to WordPress after the fact.
VIM
Enter VIM, my text editor of choice. Sublime seems to be getting a lot of
traction amongst my fellow developers, but as far as I know Sublime still lacks
terminal support – so I stick it out with VIM. That said, I really only started
to master VIM about a year ago. Before then, my interaction with VIM was limited
to random encounters changing configuration files on production servers. At the
time, I only really learned the bare minimum to get by – how to open a file,
get into insert mode, and save.
A year ago, I decided I really needed to try to master VIM. So I sat down and
did the various tutorials. Made cheat sheets. I got decent at it, but not
perfect. Right now, I’m refreshing myself and I’m setting a goal of setting
aside NetBeans for my next project to do it all in VIM as well as officially
tossing the Word Processor for writing my prose in VIM as well.
For those who want to follow along, I’ve created a public git
repository with my VIM
configuration.
VIM for Code
If I plan on developing an entire website with just VIM, then I really need to
get VIM tweaked out to do exactly what I want for development. Now, I read a lot
of tutorials, but I found Mir Nazim’s “List of VIM Plugins I Use with Mini
Tutorials” to be a very good
start.
I think the take aways from Nazim’s article are:
Install Pathogen. This is pretty much the go-to package manager for VIM
plugins.
Put your ~/.vim directory into a git repository. Move your ~/.vimrc into
your ~/.vim directory and then create a link to it. Get this set up on all
the machines you work on and then you can easily sync any change to your
configuration across all of your platforms.
Use git submodules to manage all of your VIM plugins.
The Plugins
For myself, I use the following plugins in my VIM install currently:
This combination creates two new key bindings. First, we can now hit Ctrl+t to
open a new tab in VIM. The second allows us to hit Ctrl+n to pop open NERDTree
so we can navigate around the file system and select files to open. A quick
note: in NERDTree pressing Shift+t opens a file in a new tab. An extremely
useful shortcut to know.
syntax on
filetype on
filetype plugin indent on
let g:syntastic_check_on_open=1
let g:syntastic_enable_signs=1
let g:syntastic_mod_map = { 'mode': 'active '
  \ 'activeIfiletypes': ['python', 'php'],
  \ 'passive_filetypes': ['html'] }
let g:syntastic_python_checkers = ['pyflakes']
let g:syntastic_python_flake8_args = '--ignore="E501,E302,E261,E701,E241,E126,E128,W801"'
let g:syntastic_php_checkers=['php','phpcs','phpmd']
Supposedly all of this should enable syntax checking and highlighting for Python
and PHP. Python seems to work quite well. PHP, unfoortunately, requires you to
write out the file to see the errors.
Lastly, we want to make word-search a little looser so by default we adjust some
of the search parameters:
set ignorecase
set smartcase
set gdefault
set incsearch
set hlsearch
I will skip the WordProcessorMode and CodeMode commands for latter, for now
let’s skip to the last three lines:
if filereadable(".vim.custom")
    so .vim.custom
endif
These three lines sets up VIM to look for a .vim.custom file in the directory
that it is running from and then essentially append it to the end of our
.vimrc. This allows us to create custom configurations for VIM on a
project-by-project basis.
VIM for Prose
I began this talk with a discussion on why we should use a text editor for
editing our prose. VIM works extremely well for writing code. I am not yet
entirely sold on it being the editor for prose, although I do think that any
prose-text editor had better come with VIM bindings to be worth its salt.
Right now, I am using VIM to write this and will probably be using VIM to work
on a lot of long-length prose. This gives us a number of great advantages:
Files are small
Files avoid corruption. Imagine this, if one byte of this file gets
corrupted what happens? I have a misspelled word. If this happened in a
binary file who knows if it could be recovered.
I can use my programming skills to do such things as incorporate tables via
comma-separated-files, images, or break this out into separate files and
compile them into a larger document.
I can write it using whatever mark up language I want (in this case
MarkDown) and then use a converter like Pandoc to export into nearly any
mark up language or file format.
I can take advantage of all of VIM’s keyboard functions to keep my hands on
the keyboard and my mind in the flow of putting words on paper.
So what have I done to get VIM working for prose? I dug through a lot of
tutorials and even used Vimroom for a while. At first, I loved Vimroom, but over
the course of a week the bugs and poor user interface and the abandon-ware feel
of Vimroom lead me to abandoning it.
There’s a number of bugs that simply annoyed me. For example, the some color
scheme throws all kinds of errors when toggling Vimroom, and quiting out of
Vimroom without toggling it off first requires repeated closing empty buffers to
get back to the terminal. There also appears to break the drop-downs in SuperTab
causing them to appear but only to allow you to select the first item in the
drop down.
So after a week of Vimroom, I set out to roll my own solution. The solution was
to add two commands to Vim – :Code and :Prose. These toggle between the
settings I want when writing code and the settings I want for prose.
func! WordProcessorMode()
  set formatoptions=aw2tq
  set laststus=0
  set foldcolumn=12
  set nonumber
  higlight! link FoldColumn Normal
  setlocal spell spelllang=en_us
  nnoremap \s eas<C-X><C-S>
endfu
com! Prose call WordProcessorMode()
This snippet creates a WordProcessorMode function and then on the last line,
attaches to a command :Prose. Let’s take a look at each line in part.
set formatoptions turns on an umber of important features. With a we set our
text to automatically wrap when it reaches our textwidth values. In this case,
it is 80 characters. Next, w defines our paragraphs as being separated by a
blank line. t sets our text to be automatically formatted to text width and
q allows us to use the gq command to automatically reformat selected text.
Note: you can can use gGgq to select the entirety of a document and reformat
it.
The foldcolumn and highlight lines sets a 12 column margin on the left side
of our text and sets the color of that column to the same as our background.
With spell on misspelled words will appear highlighted, we can tab through the
misspelling via [s and ]s to jump to the previous and next misspelling
respectively. Once our cursor is on a misspelled word hitting z= brings up our
corrections options and zg adds it to our personal dictionary. One addition
makes correcting words so much easier:
nnoremap \s eas<C-X><C-S>
This displayed the spelling correction options in an in place drop-down!
Before we forget. We need a function to turn all this back off again if we
wanted to jump back into code mode:
func! CodeMode()
  set formatoptions=cql
  set number
  set ruler
  set laststatus=1
  set foldcolumn-0
  setlocal nospell
endfu
com! code call CodeMode()
call CodeMode()
This function resets our environment back into code mode, and of course we call
the function on start up as well so we always begin VIM in code mode.
Last: If you, like me, plan on using MarkDown as your prose mark up language of
choice, grab the vim-markdown plugin which gives me excellent highlighting of
the MarkDown syntax.
Vim Color Scheme: Solarize
There is a bunch of color schemes available in VIM via the colorscheme
command, but honestly nothing really beats out the simple, thought out beauty of
the Solarize color scheme.
The problem is getting it to work in the console. You might notice that my
repository does not include the popular vim-solarize plugin. The reason? In
terminal mode the Solarize color scheme breaks horribly.
It took a while for me to discover the solution to this problem: change the
terminal. Granted, this solution requires you to have a desire to have the
Solarize color scheme throughout your terminal experience.
Sigurd Gartmann has a nice
repository on git
hub that, once installed allows for toggling the terminal into dark or light
mode of the Solarized color scheme.
So there you go, a complete walk through for using VIM for both development (in
this case web development) and prose writing. Enjoy.
I decided to spend the last couple of weeks introducing myself to some of the
big MVC Javascript Frameworks that have gotten so much traction over the last
couple of years. I sadly, have found the field littered with frameworks that
happily violate the principle of Unobtrusive Javascript and am wondering – is
there any solid MVC Javascript Framework that is clean and unobtrusive, will I
need to keep rolling my own, or am I just a Luddite?
Unobtrusive Javascript
Now first, I must admit that I feel as though I am a technological Luddite when
it comes to the rise of Javascript. When I started making websites the standard
advice was to keep as much of the document generation on the server-side as
possible and to practice what is called
“unobtrusive”
Javascript.
The idea of unobtrusive Javascript has been a paramount item of good front-end
design. Namely, that you clearly separate your concerns and avoid reliance on
server-side scripts. HTML ought be semantically distinct from style or behavior
and we do this by keeping our markup in one file, our style-sheets in another,
and our Javascript in a third file. We do not inline our styles nor our
Javascript and we try to keep them distinct so that even if the style-sheet or
Javascript never loads the unstyled, un-scripted document is still in a usable
state.
The earlier concept, simply keeping things separated decouples the reliance of
our code on any one element. We can change the markup, the style, or the
behavior of our application without necessarily impacting the other two
elements.
The latter idea is a concept refereed to as failing gracefully. Namely, it is
that we put fall backs into our application such that if the Javascript does not
work, the user can still make use of the web application. There’s a lot of ways
that we can do something like this:
Have an ajax form submit normally if the browser does not support ajax
Add form submit buttons that are hidden using Javascript on load.
Make sure client-side generated content has some kind of fall-back view that
is generated server-side
The list goes on and on, but you begin to get the idea. Vasilis van Gemert has
opened a great
discussion
about arguments against building Javascript based documents and his comments
section is ripe with the reasons that unobtrusive Javascript is still very much
relevant to the day-to-day development of websites.
Obtrusive Javascript is where you get page behaviors and views that are only
accessibly if the client has Javascript support. The result of these websites is
that they are completely un-usable without their supporting Javascript files. We
can see this on websites that:
Only allow a form to be submitted via a Javascript call
Links whose destination is dynamically generated with Javascript
Views that are created by generating and appending DOM elements client-side
rather than server-side
Now, I grant that unobtrusive Javascript can be hard. Sometimes there just isn’t
a suitable fallback. Some times you are running late on a project and the fact
that it runs fine on 99% of the browsers means it’s time to just shove it out
the door and be on your way. However, I do believe it is a good idea to keep the
principle of separating concerns and failing gracefully in mind whenever adding
client-side behaviors to an application.
State of Affairs for Javascript MVC
I will address in some article my own personal solutions to structuring a
Javascript application as well as the challenge of coming up with a solid
framework for addressing UX and DOM manipulation without turning into spaghetti
code or re-inventing the solution with each website. Yet, it is typically a good
idea to go with a community framework in a team environment since it offers a
familiar structure between projects and programmers on a team. For this reason,
I embarked on working my way through some of the more popular Javascript MVC
frameworks to see what they offer and decide which one, if any offers an
unobtrusive solution. My concern is that on a cursory look (AngularJS and
EmberJS) both seem to scatter Javascript snippets throughout the document and in
the latter case invents a whole new template language that it injects into a
script tag. Oh dear.
The only Javascript framework that I have come upon that makes any attempt at
keeping any kind of unobtrusive fallback seems to be Knockout.js. That said, it
is not the sexiest of new frameworks out there.
// This is a simple *viewmodel*functionAppViewModel(){this.firstName=ko.observable("Bert");this.lastName=ko.observable("Bertington");this.fullName=ko.computed(function(){returnthis.firstName()+""+this.lastName();},this);this.capitalizeLastName=function(){varcurrentVal=this.lastName();this.lastName(currentVal.toUpperCase());}}// Activates knockout.jsko.applyBindings(newAppViewModel());
Knockout works by using the data attribute to bind to DOM elements. This means
that if the Javascript happens to fail we are still left with your typical
document with typical document behaviors. Take the above example clip. If the
data-bind attributes are ignored we would still get a form with a first and last
name. Indeed, we could even fill that form in server side by assigning
value="Bert" and value="Bertington" to the first name and last name inputs.
On top of this, there is something about Knockout that just makes sense. It
isn’t as flashy as Angular or Ember. It doesn’t seem to incorporate any new
trendy templating systems, massive API libraries, or require us to create half a
dozen separate Java script files for controllers, models, and parts of views.
I had my first real exposure to the HTML5
Canvas
element this week. It was a fairly fun transport back to Intro to Computer
Graphics and my school days working in C.
Canvas provides a very simple bitmap surface for drawing, but it does so at the
expense of loosing out on a lot of the built-in DOM. I suppose there is a good
reason for not building an interface into canvas to treat drawings created with
contexts as interactive objects, but sadly this leaves us with having to
recreate a lot of that interactivity (has a user clicked on a polygon in the
canvas? is the user hovering over a polygon on the canvas?) up to us to
implement using javascript.
So let’s dive in and see what canvas is capable of doing!
This complete tutorial is available as a
fiddle on jsfiddle.net. Check it out.
Getting Started
Let’s begin with the absolute basics. First, we need the element itself which
is simply a “canvas” element with a specified id that we’ll later use to
interact with it. By putting some textual content inside the canvas element we
give some fallback for older browsers that might not offer canvas support.
<canvasid="myCanvas">Your browser does not support canvas.</canvas>
Now we need to interface with the element itself. This is done using
javascript:
We are doing two things here. First, we are getting the canvas element from the
DOM, second we are getting a context from that element. In this case that
context is the “2d” context which defines a simple drawing API that we can use
to draw on our canvas.
Drawing a Polygon
The “2d” context API defines a number of methods for interacting with the
canvas element. Let’s look at how we can use this to draw a blue triangle on
our canvas:
Recall that pixels on a computer screen are mapped as though the screen was in
the fourth quadrant of a plane – that is they spread out with x values growing
larger as the pixels are placed further to the right and y values growing
larger as they move towards the bottom of the screen. This puts the value 0,0
at the upper left corner of your screen and 25,100 located twenty five pixels
to the right and one hundred pixels from the top.
The first three lines of code can be thought of as moving an invisible (or very
light) pencil around the canvas. The first moves our pencil to the position
25,25 which should start the drawing near the upper-left corner of the canvas.
The second line draws a line down 75 pixels and over and additional 25 pixels.
The third returns to 25 pixels from the top, but 125 pixels from the left-hand
side of the canvas.
The forth and fifth lines simply define the color to fill our polygon with and
to actually do the filling. In this case we passed a hex value for blue, but we
could alternatively used and rgba (red, green, blue, alpha) value if we wanted
transparency.
Adding Interactivity
One thing you will note about our blue triangle: we can not tie off DOM events
to it. The context merely draws on the canvas, but the drawings themselves do
not exist in the DOM. The closest we can do is capture events on the canvas
itself (onClick, hover, etc.). It is up to us to then decide if those events
were just interacting with the canvas or whether they should are interacting
with something drawn on the canvas.
First, we must recognize that each position that we move or draw the context to
is a vertices.
PNPOLY
is our solution, and to be honest, I did not come up with this one but found
the answer on Stack
Overflow
PNPOLY takes five variables: the number of vertices (corners) on our polygon,
an array of the X values, an array of the Y values, and the x/y cordinates
where the user clicked on the canvas. Now if we add this to our code and run it
we should see an alert saying either true or false as to whether we clicked
inside or outside of our triangle.
Accounting for Global (Window) and Local Cordinate Systems
It is not easy to see on the jsFiddle website, but we can run into some issues
with mapping between the local and global coordinate systems. e.clientX and
e.clientY map to the document coordinate system not the canvas itself. We
may, in some instances find ourselves needing to map between the local (canvas)
coordinates which begins with 0,0 at the upper-left corner of the canvas
element and the document coordinate system which begins with 0,0 at the
upper-left most corner of the page.
This can occur when our canvas is absolutely positioned or positioned inside a
fixed element. In these cases we must include the offset of the canvas from the
document coordinate system to find where the click is actually occurring:
Note our additions to the first three lines in our function. The first line
retrieves the offset for the position of our canvas from it’s global position.
We then subtract that offset from e.clientX and e.clientY to get the
coordinates of the click in the canvas’s coordinate system.
We might also need to add another variable to our offsets and that is to
account for scrolling. If we have a canvas inside a fixed position element then
we must also account for any potential scrolling that might have occurred. We
do this via the scrollTop() and scrollLeft() jQuery functions:
In fact, we can safely include the offset(), scrollLeft(), and
scrollTop() calls even if we are neither using absolute nor fixed positioned
elements since these values will simply be 0 in the case of a statically
positioned canvas.
As of PHP 7 the function described below is no longer neccessary as it’s been
superceded by the Null Coalesce Operator.
Null Coalesce allows a nice bit of syntactical sugar for a checking if a
variable is set and then returns that variable if it is or some fallback value
if it is not:
<?=$title??'Blog Title'?>
Outputs the value of $title if it is set or ‘Blog Title’ if it is not. It is
the same as doing:
<?=isset($title)?$title:'Blog Title'?>
My favorite helper function for CodeIgniter is a ridiculously simple function
that has an amazing amount of utility. I stole, at least the idea of, this
function from LemonStand and it has since made its way into nearly every CMS
that I have worked on:
<?php/**
* Check if $var is set and if not return null or default
* @param mixed $var The var to check if it is set.
* @param mixed $default The value to return if var is not set.
*/functionh(&$var,$default=null){returnisset($var)?$var:$default;}
At first this doesn’t really seem to be doing much, after all at first glance
it looks like it is nothing more than a wrapper for isset, but this improves
heavily upon isset in two very important ways. First, let’s look at how this
function works.
In the function definition we are taking a reference to a variable. Recall, a
reference is pointing at the memory, not value, of a variable and so we can
actually pass to our helper function a variable that has not yet been
initialized. This saves us from receiving a notice that the variable does not
exist. Our call to isset thus checks our memory to see if it is actually
referencing a variable or nothing at all. If it is referencing an actual
variable it returns that variable, otherwise it returns null (our default
default) or whatever value has been assigned to $default.
The utility of this is best expressed in handful of examples. The biggest use
of this is in a view. Let us look at a view constructed without the use of our
helper function:
<h2><?=isset($title)?$title:'Blog Title'?></h2><p><?=isset($content)?$content:null?></p>
etc.
In a sizable view the above can get quite long and quite cumbersome to
maintain. Each call to isset is checking to see if the controller actually
passed the value on to the view ( $title or $content ). If we did not do
this we would get a notice from PHP. Sometimes this is resolved by
programmers by using the error suppression symbal (@), however the notices
will still end up in the logs of many frameworks that strictly check for
errors. Contrast this with a view using our helper function:
<h1><?=h($title,'Blog Title')?></h2><p><?=h($content)?></p>
etc.
The above is a much, much more concise view that is easier to read and is still
a strictly valid snippet of PHP that generates no warnings or notices.
Once we start to use this helper function regularly all different kinds of uses
come up for it, for example we can use it to see if a model returned a value:
<?php/* 1. Longer method without using the helper function */$page=$this->pages->getByURI($url);if(!$page){$page=$this->pages->get404();}$this->render($page);/* 2. With helper function */$page=h($this->pages->getByURI($url),$this->pages->get404());$this->render($page);
The above snippets are fairly simple, but let’s walk through them. In both
instances we need to pass some page object on to the render method. An error
occurs if it does not get a valid page object so we must check after
retrieving a page that it actually exists. In the first snippet we use four
lines of code to first get a page by $url (the value of which is set
somewhere else). Now if the pages model returns nothing then we enter a
conditional statement that retrieves the 404 error page.
However, with the use of our helper function we can shorten the code in half
and remove the conditional all together make it a much more readable snippet of
code. The first line of the second snippet simply passes the return of the
pages model and the get404 method into our helper function which returns
the first if it returns something or the latter if it does not. The only
downside is the additional load since the 404 page would also need to be loaded
concurrent to the current page with each request, but in most cases this is
going to be negligible.
Having looked at two different uses for our helper function, we can begin to
see that we can get quite a bit out of some very very small functions. If you
have your own favorite one-liner functions feel free to share in the comments
below.
In this article I plan on addressing CodeIgniter’s shortfalls as a framework
for validating objects and introduce a method for improving the validator
classes re-usability.
When To Validate?
The answer to this question is simple: whenever we are dealing with input. The
(incorrect) assumption that CodeIgniter and many web-applications make is that
user input comes in the form of GET and POST variables and a considerable
amount of effort goes into validating inputs via these routes. However, GET
and POST are not the only sources for user input. User input can come via
external sources such as tying into a remote API, an RSS feed, or from the
database itself. From each of these sources we could get an invalid state. In
the case of the remote API or RSS feed this is easy to understand. The API
could change, or the RSS feed could be malformed. In the case of the database
the issue typically appears when data is stored into the database under one
context but is then accessed with a different expectation.
Take for example a database with the following table:
Now say that we inserted a person with name “Bob” and birthdate
“1975-01-01.” This passes the validator going into the database, but later on
we pull this row from the database and use it to construct a plain PHP object
with properties id, name, and birthdate which we pass onto the view and
attempt to output the birthdate with the following line:
<?phpechodate('Y-m-d',$person->birthdate);
This is going to cause an error. Why? Because the date function is expecting
the second parameter to be a UNIX timestamp, but birthdate is already a
formatted date string. Now, we could solve this by changing the schema of the
database or changing the schema of the person object, but it is important to
note that even if we did fix the disparity between the two we would still not
fix the issue that it is possible for the person object to exist in an
invalid state.
So my answer is to when should validation occur is during object instantiation
and setting. The properties of the object should not be able to be set to a
value that the object cannot accept. This places validation clearly into the
realm of the “M” in “MVC.”
Form Validation in CodeIgniter
CodeIgniter’s
documentation
offers a form validation class that makes the above mistake very clearly. It
can only validate the POST super global and doesn’t really offer much of a
solution towards validation of objects themselves. Furthermore, their example
controller oddly mixes the issue of object validation, and thus business logic,
inside the controller which tends to create in many CI application fairly
bloated controllers:
I cannot offer a solution towards adapting the validation class to be fully
object operating without a heavy rewrite of the class, but we can move this
obtuse validation into a distinct model that encapsulates this behavior away
from the controller.
Introducing the Abstract Validator Class
We can get the validation logic out of the controller by moving it into a
Validator class. We begin with an abstract base class since each form will
need their own validator classes:
<?phpabstractclassValidatorextendsCI_Model{protected$rules=array();protected$fields=array();# Get keys of fields.publicfunctiongetStructure(){returnarray_keys($this->fields);}# Validate $_POST against the rules and fields.publicfunctionvalidate(){foreach($this->rulesas$key=>$rule){$this->form_validation->set_rules($key,$this->fields[$key],$rule);}return$this->form_validation->run($this);}}
We take advantage of the fact that the CI god to access the form_validation
object inside the Validator instance to create the validate method which
merely sets the validation rules and then runs them. The Validator has two
properties $rules and $fields which we will use in sub-classes to provide
the CI_Validator rules and fields strings. We can transform the above
controller into the following subclass:
Here we can see how the rules and fields are used as well as how we can extend
the Validator class to add additional unique callback validations. This
simplifies the controller significantly:
I have been keeping my own personal accounts for some time in a progressively
growing spreadsheet that after one decade of use, multiple files, and dozens of
worksheets. The entire thing is quite a mess. My solution? Build an app for it!
Pecunia will be a simple budgeting application designed from the ground up for
keeping track of monthly budgets, annual budgets, and keeping a ledger of
individual expenses. With a little bit of work, I should be able to turn it into
a multi-user application to launch as an extension on Kynda.net for public use
as well as an open source repository on Bitbucket.
This also gives me an excuse for a long series of posts going through the steps
necessary to take a spread sheet, abstract it’s logic into models, and implement
it’s functionality into a useful application.
Resources
Pecunia will be built using the following resources:
PHP 5.4
Apache 2.2
MySQL 5.5
Silex
Laraval 4
Update: January 22, 2014
After some consideration, I am opting away from Silex towards using Laraval 4.
It is not that I have suddenly found a dislike for Silex, rather I love working
with it, but that I would like to try my hands at the “latest and greatest” to
see what the big deal is about and to add another tool to my retinue.
I have worked with Code Igniter almost exclusively for the last nine months. In
that time, I have found it to be a massive step ahead over working with some of
the major CMS systems on the market (WordPress, I am looking at you).
Nevertheless, there remains some major architectural and blind spots that exist
in CodeIgniter as a framework. Some of these issues are resolvable
(CodeIgniter’s presumption that you would only ever want to validate the POST
superglobal), while others are inherent in it’s design. In this series I hope to
look at some of these issues that I have found with CodeIgniter, showcase
work-arounds where I can, or simply rant where no good solution exists. Today’s
topic will be of the latter variety.
The God Object AntiPattern
Lets dip over to WikiPedia for the definition of a God
Object:
In object-oriented programming, a god object is an object that knows too much
or does too much… a program’s overall functionality is coded into a single
“all-knowing” object, which maintains most of the information about the entire
program and provides most of the methods for manipulating this data. Because
this object holds so much data and requires so many methods, its role in the
program becomes god-like (all-encompassing). Instead of program objects
communicating amongst themselves directly, the other objects within the
program rely on the god object for most of their information and interaction.
The God Object in CodeIgniter
CodeIgniter started as an early MVC framework that has maintained backwards
compatibility with PHP5.2. It’s maintainers have insisted on maintaining this
compatibility which has limited CI from taking advantage the advances that
PHP5.3, 5.4, and 5.5 introduced to the language.
There remains nothing truly wrong with PHP5.2. While 5.3+ offers us many great
advantages, a SOLID framework is still possible using the older version. CI’s
architectural issues do not stem necessarily from it’s usage of the older
version but rather the violation of SOLID principles in archetyping it’s
interpretation of MVC.
In CI we have the CI super class (the idea of a super class alone should be a
code smell) that is globally available via the get_instance() function. This
returns an instance of CI_Controller, our main application controller handling
the current request. This instance is our elusive beast. The God Object itself.
We’ll call this object CI from here on out.
In any one request there can be only one instance of CI – it is essentially a
singleton responsible for:
Loading models
Processing the request
Returning the response
Overloaded Models
Here is where we get into the meat and potatoes.
The CI object begins its life by loading resources, that is it begins by loading
various models and libraries and maintaining links to each of them like so:
This code instantiates an instance of the news model and assigns a reference to
news. It then instantiates an instance of events. In this manner every model
that comes into existence during request process is held as a reference by the
CI object and can be access latter on in the request, e.g.
Once more, something very peculiar is done during this process. CI not only
instantiates an instance of the given model but it also copies these
references to every subsequently loaded model.
Thus every object that is loaded in this manner becomes aware of every object
that had been loaded up-to that point regardless of whether that object really
needed access to the behaviors of those objects. The model becomes unnecessarily
bloated and the difficulty of debugging the behaviors of a given model
increases. Unintended behaviors might be caused not by the model itself but by
the combination of that particular model and the order or selection of
previously loaded models.
Examine a Model’s State? No way.
Take for example the simple act of using var_dump to see the state of an
object in memory. If we were to var_dump our instance of news we might as
well call it a day as news contains a reference to everything that has been
loaded into memory for our request. The server will proceed to dump the entirety
of our application to the screen for us to wade through!
No Public Property is Safe
A larger issue is the assigning of the references themselves. Since the first
act of initiating the model object is to copy CI’s massive registry of
references to the model any properties or references set in the model’s
constructor is at the mercy of the controller overwriting the model. Take for
example, the events model. Let’s say the following was in the constructor:
Following substantiation of the events object the Events object CI will
immediately overwrite the news property with it’s own instance of the news
property. Thus the events model would either need to make the news property
private or protected which would generate an error when CI attempts to
access it or we would always need to take care to keep our model properties from
existing in the same namespace as CI.
I actually ran into a horrible bug where this very thing happened. I had a class
named Validator that I loaded in with the controller. I also intended each of
my models to load their own instances of the Validator class and to initialize
their instances with own unique validation parameters. However, since the
controller had already loaded an instance of Validator it immediately
overwrote each of my model’s Validator’s forcing them all to use the same
instance of the class. The resolution to this problem was to have to name each
instance of Validator something different, thus we had EventValidator,
NewsValidator, etc.
I decided to share my fix for lightboxing in NextGEN Gallery 2.0.21. This
version of the WordPress plugin for some odd reason breaks support for
lightboxing the gallery images (that is having the gallery image “pop out” in
front of the page when clicked).
This fix does not modify the NextGEN gallery itself so we can easily revert to
using NextGEN’s lightboxing whenever it gets fixed.
Follow these steps:
1. Turn off NextGEN Lightbox Effect
Log into the dashboard of your WordPress installation and navigate to `Gallery
Other Options and select Lightbox Effects. There select from the drop down
No lightbox`
2. Install Lightbox 2 v2.6
It is important to have the most up-to-date version of Lightbox because of
compatiblity issues with jQuery 1.10. Go to the Lightbox 2
website and
download
the latest version of lightbox, unzip the download and upload the resulting
directory into your theme’s directory on your server (it should be in
/wp-content/themes/).
3. Update header.php To Load Lightbox 2
Now from the WordPress dashboard select Appearance >> Editor >> header.php.
For those of you without programming experience this might seem arcane but
follow along. Between the <head> and </head> tags include the following
lines of code:
Where THEME is the name of your current WordPress theme.
4. Add Custom Script to Your Footer
There is two ways of going about this. First navigate this time to `Apperance »
Editor » footer.php. We can either append the javascript directly to the end of
this file, or (the better solution) you could create an external javascript file
and load it.
To do the latter, you simply create a file named lightfix.js and paste the
script below minus the <script> and </script> tags. Then include it in your
file the same way that you included lightbox-2.6.min.js above only this time
append the include to the end of the footer.php.
If you want to just put the script directly in footer.php just copy the text
below directly into the file:
You might need to modify .storycontent img to fit your own theme. This script
selects all the img html elements in the div with a class name
storycontent it then loops through each of these images and if they are
contained inside an anchor tag then it transforms that image into a lightbox.
Since each picture in the NextGEN gallery is wrapped in an anchor tag linking to
the image source this should automatically work alongside Lightbox 2 to return
the lightbox functionality to our gallery.
When I started making websites in the 1990s we had a much smaller set of tools
and a lot of websites were what we would today call “static.” A static site was
nothing more than a folder of html files that contained both the content and
layout of the site. If we wanted to change the layout of our site, we would
either need to get new content or go through each individual file and update
the layout.
Today we have CSS which introduced the paradigm of sperating content from
layout. A site that applies this principle throughout its implementation will
be a site that can easily be “reskined” or “re-templatized” without needing to
port the content from the old site.
I have been working with CSS for some time, but one item about the WC3
standards always eluded me: the requirement for all HTML image tags to have an
alt tag. Why should an image have an alt tag? Afterall, not every image has a
suitable alt tag. Any given site contains drop shadows, gradients, invisible
spacers, little meaningless image flourishes. Should we label each and every
one? Then I realized why this rule is in place: the image tag must be
reserved for content!
Lorem ipsum dolor sit amet, in cum possit oporteat, et vel aperiam apeirian. No
quem graece referrentur eum, ei his case gloriatur appellantur. Nec error
consetetur an, est dicam semper imperdiet ea. Eu duo choro recusabo. Qui at
velit aperiam, volumus sensibus deseruisse ei ius, mea an homero primis
scripta. Ex elit maiestatis signiferumque sea. Mei vidit efficiendi disputando
ex, ei erat soluta sed. Sit at nulla putent, ancillae honestatis eos an. Ius
nisl audire noluisse in, per ea commodo nominati, usu brute adversarium id.
Quem alia tamquam mel at. In atqui admodum vix.
There exists no real reason that the two curved images used to create the
rounded corners on the above div should need an alt tag. Indeed, if we look at
the source code, we would find this solution rather messy:
An image is content if it conveys a meaning or invokes an action. That is, if
you can
Call an event on the image (click or mouseover)
List item Write a caption for the image. If one or two is true, then the
image is content. Otherwise the image is reserved for the dregs of layout.
How should a layout image be reperesented?
Here is where CSS comes into play via the background property and where my
earlier mistake takes place. I had assumed that the background property was
expressed for the purpose of backgrounds! That is, since a div collapses if it
contains no content, then the background property ought to be preserved only
for divs that contain content in which case the background goes behind that
content. My discovery is this: the background property is for *much more than
just backgrounds!
It is best to think of the background tag as a means of adding stylized images
or colored blocks into a design’s layout. So if we desired rounded corners on
our divs we shouldn’t resort to using the image tag, but rather ought to use
the background property on an empty div then add width and height to ensure it
does not collapse such as so:
Lorem ipsum dolor sit amet, in cum possit oporteat, et vel aperiam
apeirian. No quem graece referrentur eum, ei his case gloriatur appellantur.
Nec error consetetur an, est dicam semper imperdiet ea. Eu duo choro recusabo.
Qui at velit aperiam, volumus sensibus deseruisse ei ius, mea an homero primis
scripta. Ex elit maiestatis signiferumque sea.

Mei vidit efficiendi disputando ex, ei erat soluta sed. Sit at nulla putent,
ancillae honestatis eos an. Ius nisl audire noluisse in, per ea commodo
nominati, usu brute adversarium id. Quem alia tamquam mel at. In atqui admodum
vix.
A much cleaner solution to using alt tags! I hope this clears up some
misconceptions about how to properly use the image tag and how to utilize CSS
for layout images.
I dabbling more and more with JavaScript lately. In the past my solutions to most site-related problems has been to write server-side PHP modules to add whatever functionality I needed. Since I started using WordPress to manage my site content, I started finding myself using JavaScript to ease-up on the amount of html that I need to type into my post boxes. Take Lightbox for an example. Lightbox is a pretty amazing piece of JavaScript that easily creates animated slideshows out of a series of image links. I use it on my art and photography pages. The problem with Lightbox? Telling Lightbox to animate a link rather than just link straight to the pictures is very verbose. For example to create this animation:
“This ink wash panel from my webcomic ‘Ivan @ the End of the World,’ shows my growing interest in the use of water-based ink washes to depict gradient shading in my works.”
I need to type the following into WordPress:
<span style="color: #009900;"><<a href="http://december.com/html/4/element/a.html"><span style="color: #000000; font-weight: bold;">a</span></a> <span style="color: #000066;">title</span><span style="color: #66cc66;">=</span><span style="color: #ff0000;">"This ink wash panel from my webcomic Ivan @ the End of the World, </span>
<span style="color: #009900;">          shows my growing interest in the use of water-based ink washes to </span>
<span style="color: #009900;">          depict gradient shading in my works."</span></span>
<span style="color: #009900;">   <span style="color: #000066;">rel</span><span style="color: #66cc66;">=</span><span style="color: #ff0000;">"lightbox[sketch]"</span> </span>
<span style="color: #009900;">   <span style="color: #000066;">href</span><span style="color: #66cc66;">=</span><span style="color: #ff0000;">"/images/art/sketch_ivan.jpg"</span> ></span>
    <span style="color: #009900;"><<a href="http://december.com/html/4/element/img.html"><span style="color: #000000; font-weight: bold;">img</span></a> <span style="color: #000066;">class</span><span style="color: #66cc66;">=</span><span style="color: #ff0000;">"aligncenter"</span> </span>
<span style="color: #009900;">         <span style="color: #000066;">src</span><span style="color: #66cc66;">=</span><span style="color: #ff0000;">"/images/art/sketch_ivan.jpg"</span> </span>
<span style="color: #009900;">         <span style="color: #000066;">alt</span><span style="color: #66cc66;">=</span><span style="color: #ff0000;">"Ivan Panel"</span> <span style="color: #000066;">width</span><span style="color: #66cc66;">=</span><span style="color: #ff0000;">"60%"</span> <span style="color: #66cc66;">/</span>></span>
<span style="color: #009900;"><<span style="color: #66cc66;">/</span><a href="http://december.com/html/4/element/a.html"><span style="color: #000000; font-weight: bold;">a</span></a>></span>
Why so much text? First, Lightbox uses the anchor’s title attribute to generate a caption rather than the image’s alt text. The result is the repetition of the string value for the alt and title attributes. Second, lightbox uses the anchor tag’s href value to direct the browser to load the full resolution image. This allows the image tag to point to a smaller thumbnail picture. Yet in most cases of blogging, the thumbnail is just the original picture reduced to fit into the blog’s div. If this is the case than the href attribute on the anchor is merely replicating the src attribute on the image tag. What we really want, is to shorten the monstrosity above into this:
<span style="color: #009900;"><<a href="http://december.com/html/4/element/a.html"><span style="color: #000000; font-weight: bold;">a</span></a>></span>
    <span style="color: #009900;"><<a href="http://december.com/html/4/element/img.html"><span style="color: #000000; font-weight: bold;">img</span></a> <span style="color: #000066;">class</span><span style="color: #66cc66;">=</span><span style="color: #ff0000;">"aligncenter"</span> </span>
<span style="color: #009900;">         <span style="color: #000066;">src</span><span style="color: #66cc66;">=</span><span style="color: #ff0000;">"/images/art/sketch_ivan.jpg"</span> </span>
<span style="color: #009900;">         <span style="color: #000066;">alt</span><span style="color: #66cc66;">=</span><span style="color: #ff0000;">"This ink wash panel from my webcomic 'Ivan @ the End of the World,' </span>
<span style="color: #009900;">              shows my growing interest in the use of water-based ink washes to </span>
<span style="color: #009900;">              depict gradient shading in my works."</span> <span style="color: #000066;">width</span><span style="color: #66cc66;">=</span><span style="color: #ff0000;">"60%"</span>></span>
<span style="color: #009900;"><<span style="color: #66cc66;">/</span><a href="http://december.com/html/4/element/a.html"><span style="color: #000000; font-weight: bold;">a</span></a>></span>
So much shorter! But how? The solution is in a very simple JavaScript function that I wrote which adds the Lightbox script to all images surrounded by empty anchor tags:
<span style="color: #339933;">*</span>  lightboxThis is a convenient method <span style="color: #000066; font-weight: bold;">for</span> transforming all anchored
<span style="color: #339933;">*</span>  images <span style="color: #000066; font-weight: bold;">in</span> a specified div into lightbox images. <span style="color: #660066;">To</span> use
<span style="color: #339933;">*</span>  lightboxThis call it during the onload event <span style="color: #000066; font-weight: bold;">in</span> the  tag
<span style="color: #339933;">*</span>  and pass it the divId <span style="color: #000066; font-weight: bold;">for</span> images that should be lightboxed.
<span style="color: #339933;">*</span>  <span style="color: #339933;">@</span>param string divId The unique id<span style="color: #339933;">,</span> all images wrapped <span style="color: #000066; font-weight: bold;">in</span> empty anchor
<span style="color: #339933;">*</span>   tags <span style="color: #009900;">(</span><span style="color: #339933;">&</span>lt<span style="color: #339933;">;</span>a<span style="color: #339933;">>&</span>lt<span style="color: #339933;">;/</span>a<span style="color: #339933;">></span><span style="color: #009900;">)</span> <span style="color: #000066; font-weight: bold;">in</span> the specified div will be transformed into
<span style="color: #339933;">*</span>   lighbox images. <span style="color: #660066;">Note</span><span style="color: #339933;">:</span> <span style="color: #000066; font-weight: bold;">this</span> method uses the img alt attribute
<span style="color: #339933;">*</span>   to determine the caption and will only work <span style="color: #000066; font-weight: bold;">if</span> an alt tag is
<span style="color: #339933;">*</span>   included <span style="color: #000066; font-weight: bold;">in</span> each image<span style="color: #339933;">,</span> <span style="color: #000066; font-weight: bold;">if</span> no caption is desired <span style="color: #000066; font-weight: bold;">set</span> the alt
<span style="color: #339933;">*</span>   attribute to alt<span style="color: #339933;">=</span><span style="color: #3366CC;">" "</span>.
<span style="color: #339933;">*</span>  <span style="color: #339933;">@</span>param optional bool group If <span style="color: #000066; font-weight: bold;">this</span> parameter is <span style="color: #000066; font-weight: bold;">set</span> to <span style="color: #003366; font-weight: bold;">true</span> than
<span style="color: #339933;">*</span>   lighboxThis will group all images <span style="color: #000066; font-weight: bold;">in</span> the specified div into
<span style="color: #339933;">*</span>   a lighbox group with the name of the unique div id as the
<span style="color: #339933;">*</span>   group name <span style="color: #009900;">(</span>e.<span style="color: #660066;">g</span>. <span style="color: #660066;">rel</span><span style="color: #339933;">=</span><span style="color: #3366CC;">"lighbox[divId]"</span><span style="color: #009900;">)</span>
<span style="color: #339933;">*/</span>
<span style="color: #000066; font-weight: bold;">function</span> lightboxThis<span style="color: #009900;">(</span>divId<span style="color: #339933;">,</span> group<span style="color: #009900;">)</span> <span style="color: #009900;">{</span>
    <span style="color: #000066; font-weight: bold;">var</span> anchors <span style="color: #339933;">=</span> document.<span style="color: #660066;">getElementById</span><span style="color: #009900;">(</span>divId<span style="color: #009900;">)</span>.<span style="color: #660066;">getElementsByTagName</span><span style="color: #009900;">(</span><span style="color: #3366CC;">"a"</span><span style="color: #009900;">)</span><span style="color: #339933;">;</span>
    <span style="color: #000066; font-weight: bold;">for</span> <span style="color: #009900;">(</span>i <span style="color: #339933;">=</span> <span style="color: #CC0000;">0</span><span style="color: #339933;">;</span> i <span style="color: #339933;">&</span>lt<span style="color: #339933;">;</span> anchors.<span style="color: #660066;">length</span><span style="color: #339933;">;</span> i<span style="color: #339933;">++</span><span style="color: #009900;">)</span> <span style="color: #009900;">{</span>
        <span style="color: #000066; font-weight: bold;">var</span> innerChild <span style="color: #339933;">=</span> <span style="color: #CC0000;">0</span><span style="color: #339933;">;</span>
    innerChild <span style="color: #339933;">=</span> anchors<span style="color: #009900;">[</span>i<span style="color: #009900;">]</span>.<span style="color: #660066;">getElementsByTagName</span><span style="color: #009900;">(</span><span style="color: #3366CC;">"img"</span><span style="color: #009900;">)</span><span style="color: #339933;">;</span>
    <span style="color: #000066; font-weight: bold;">if</span> <span style="color: #009900;">(</span>innerChild<span style="color: #009900;">[</span><span style="color: #CC0000;">0</span><span style="color: #009900;">]</span> <span style="color: #339933;">&&</span> <span style="color: #339933;">!</span>anchors<span style="color: #009900;">[</span>i<span style="color: #009900;">]</span>.<span style="color: #660066;">href</span><span style="color: #009900;">)</span> <span style="color: #009900;">{</span>
        anchors<span style="color: #009900;">[</span>i<span style="color: #009900;">]</span>.<span style="color: #660066;">href</span> <span style="color: #339933;">=</span> innerChild<span style="color: #009900;">[</span><span style="color: #CC0000;">0</span><span style="color: #009900;">]</span>.<span style="color: #660066;">src</span><span style="color: #339933;">;</span>
        anchors<span style="color: #009900;">[</span>i<span style="color: #009900;">]</span>.<span style="color: #660066;">title</span> <span style="color: #339933;">=</span> innerChild<span style="color: #009900;">[</span><span style="color: #CC0000;">0</span><span style="color: #009900;">]</span>.<span style="color: #660066;">alt</span><span style="color: #339933;">;</span>
        <span style="color: #000066; font-weight: bold;">if</span><span style="color: #009900;">(</span><span style="color: #339933;">!</span>group<span style="color: #009900;">)</span> <span style="color: #009900;">{</span> anchors<span style="color: #009900;">[</span>i<span style="color: #009900;">]</span>.<span style="color: #660066;">rel</span> <span style="color: #339933;">=</span> <span style="color: #3366CC;">"lightbox"</span><span style="color: #339933;">;</span> <span style="color: #009900;">}</span>
            <span style="color: #000066; font-weight: bold;">else</span> <span style="color: #009900;">{</span> anchors<span style="color: #009900;">[</span>i<span style="color: #009900;">]</span>.<span style="color: #660066;">rel</span> <span style="color: #339933;">=</span> <span style="color: #3366CC;">"lightbox["</span><span style="color: #339933;">+</span>divId<span style="color: #339933;">+</span><span style="color: #3366CC;">"]"</span><span style="color: #339933;">;</span> <span style="color: #009900;">}</span>
    <span style="color: #009900;">}</span>
    <span style="color: #009900;">}</span>
<span style="color: #009900;">}</span>
If you’re interested in implementing this on your own blog simply copy the function into your WordPress theme’s header and surround it with tags. Then you need to add the following to your theme’s <body> tag:
body onload<span style="color: #339933;">=</span><span style="color: #3366CC;">"lightboxThis('blog_area')"</span><span style="color: #339933;">></span>
Where ‘blog_area’ is the name for the div id where your blog’s posts reside.


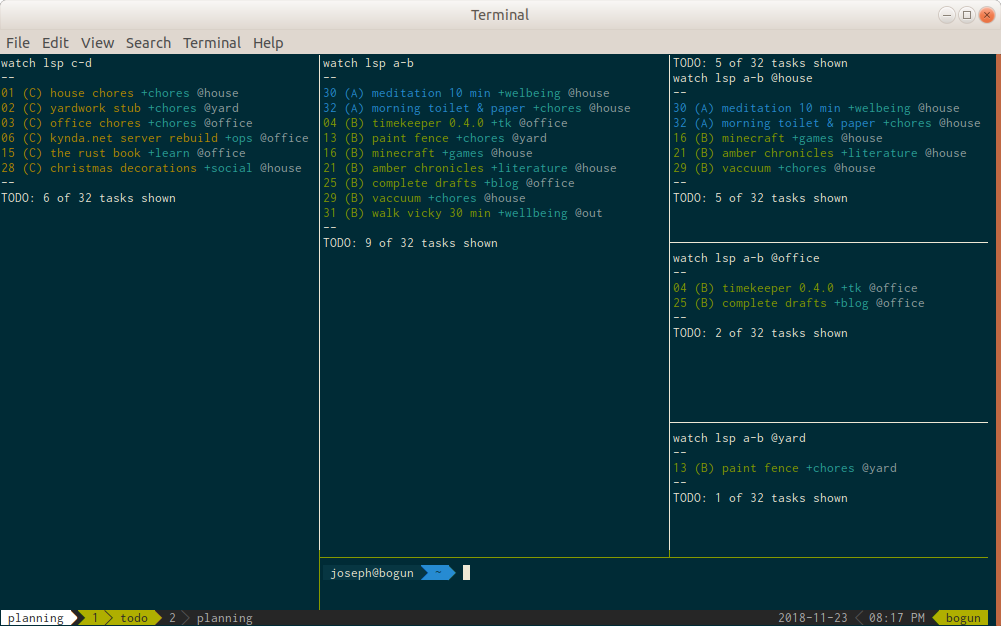
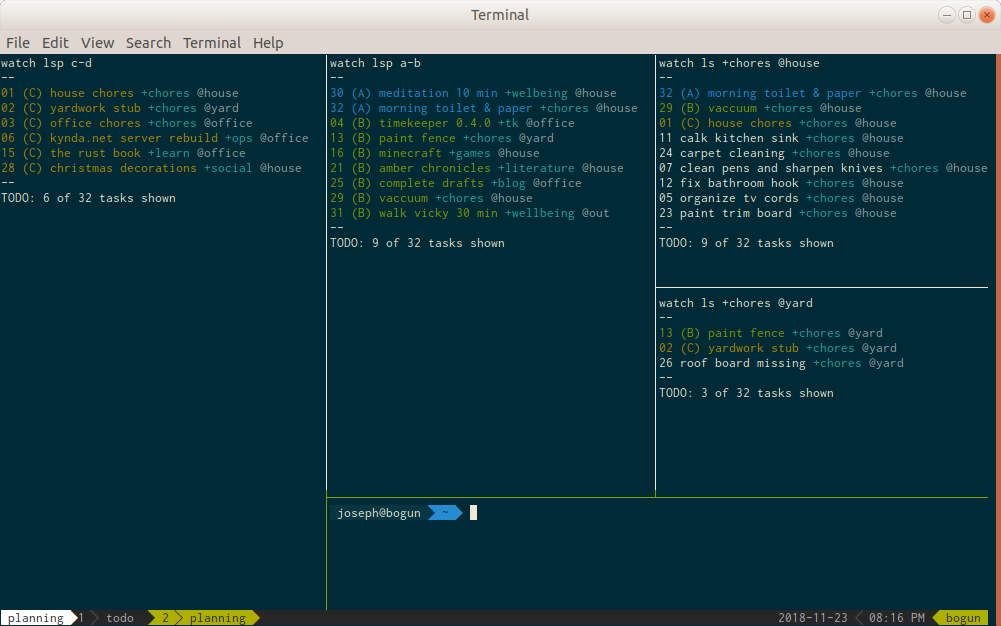
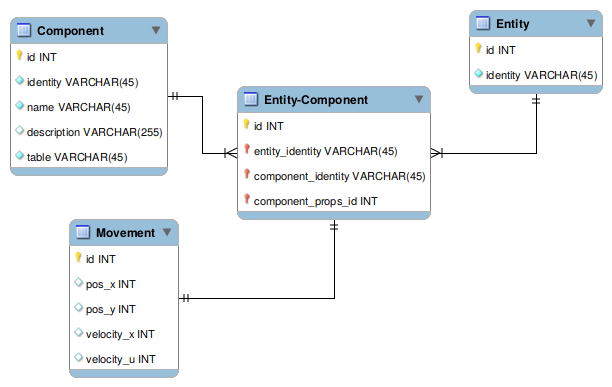
")


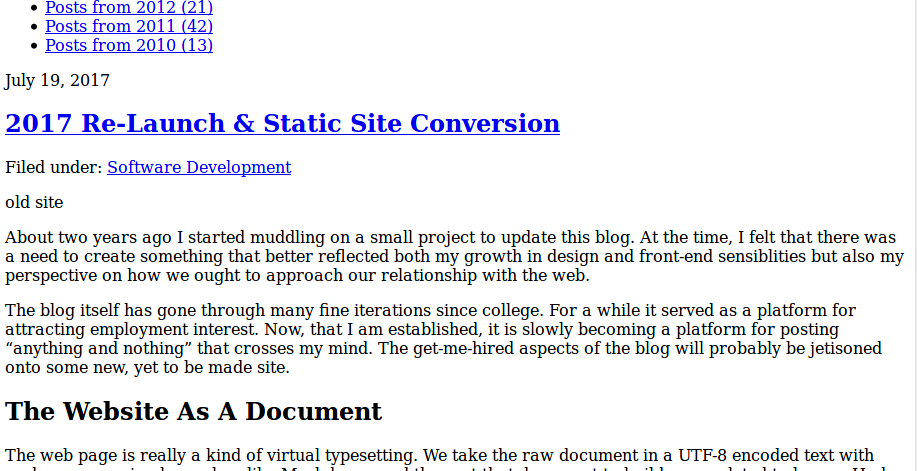


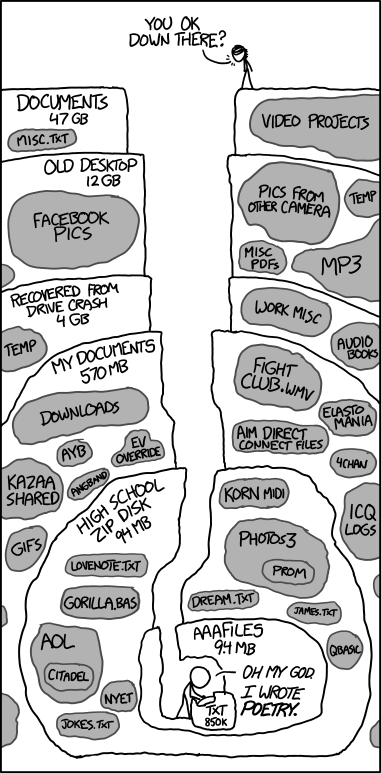
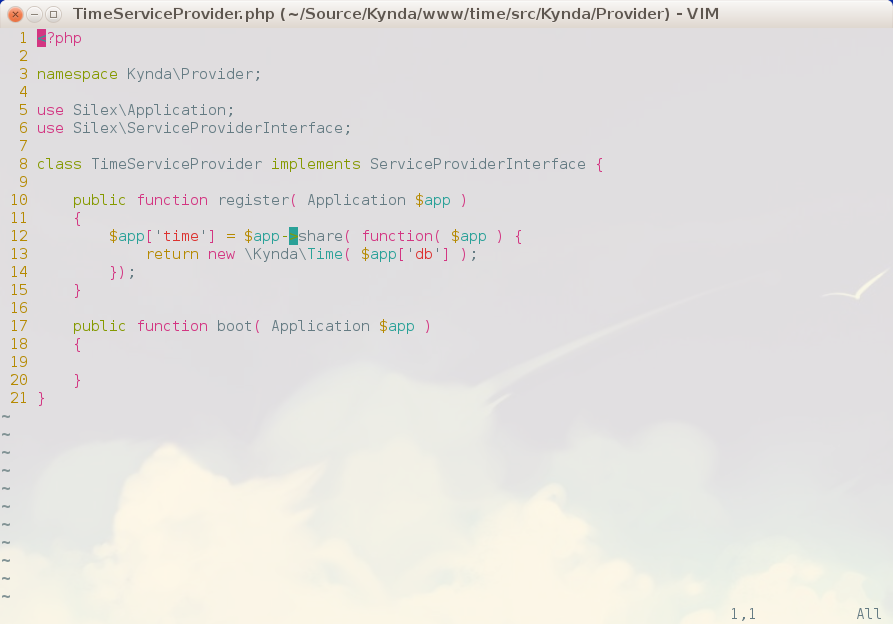


 “This ink wash panel from my webcomic ‘Ivan @ the End of the World,’ shows my growing interest in the use of water-based ink washes to depict gradient shading in my works.”